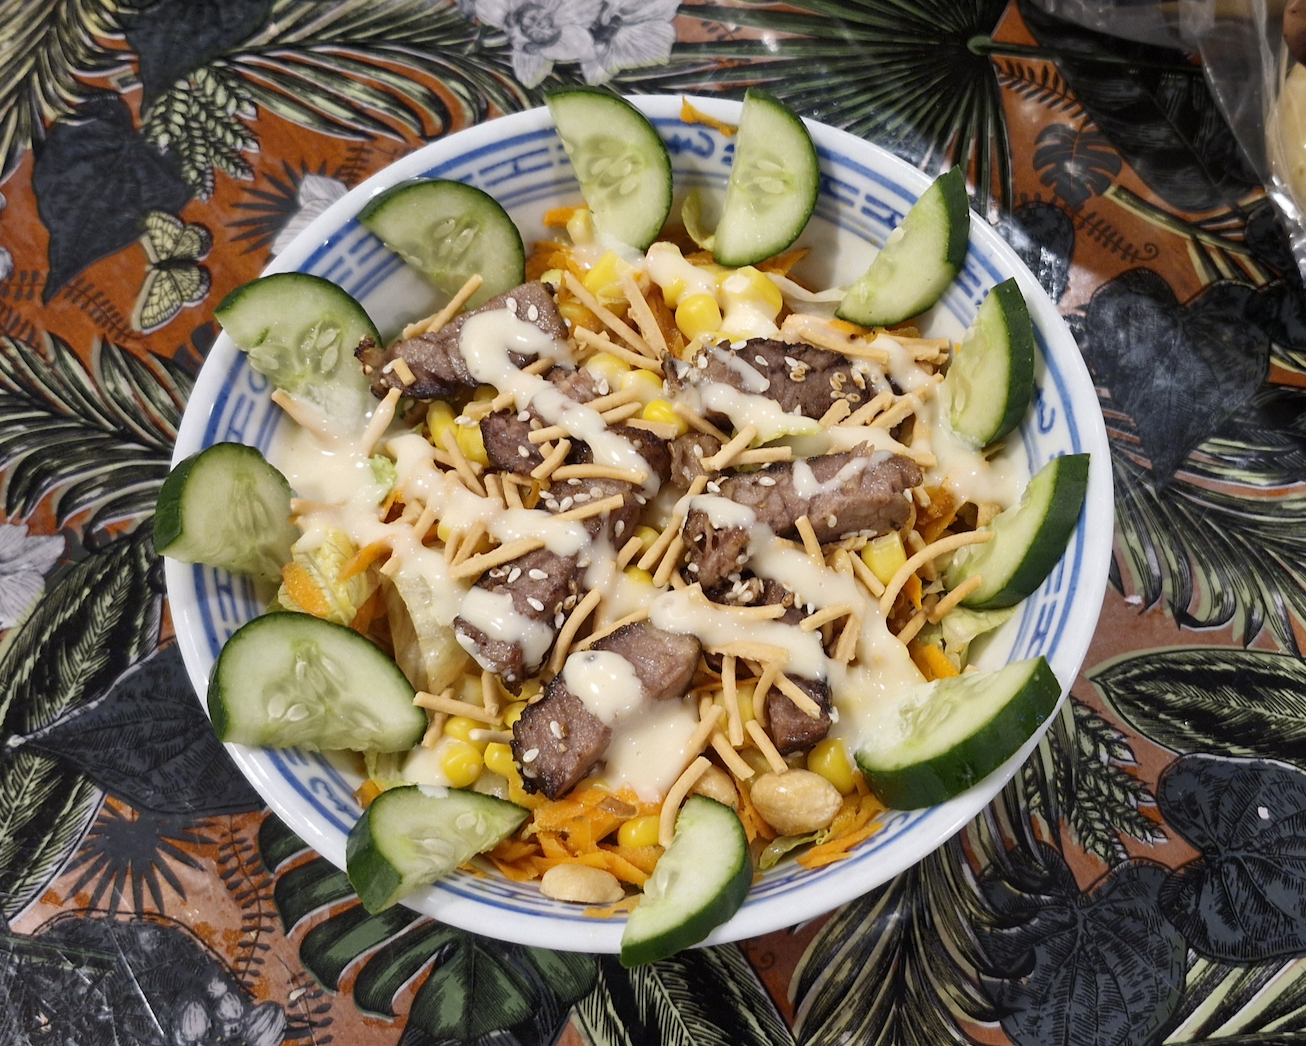
Crunchy Noodle Salad
I’m intolerant of most vegetables, so when I eat a salad it has to be good enough to make up for likely stomach cramps. At the moment, this salad is something I look forward to making for days.
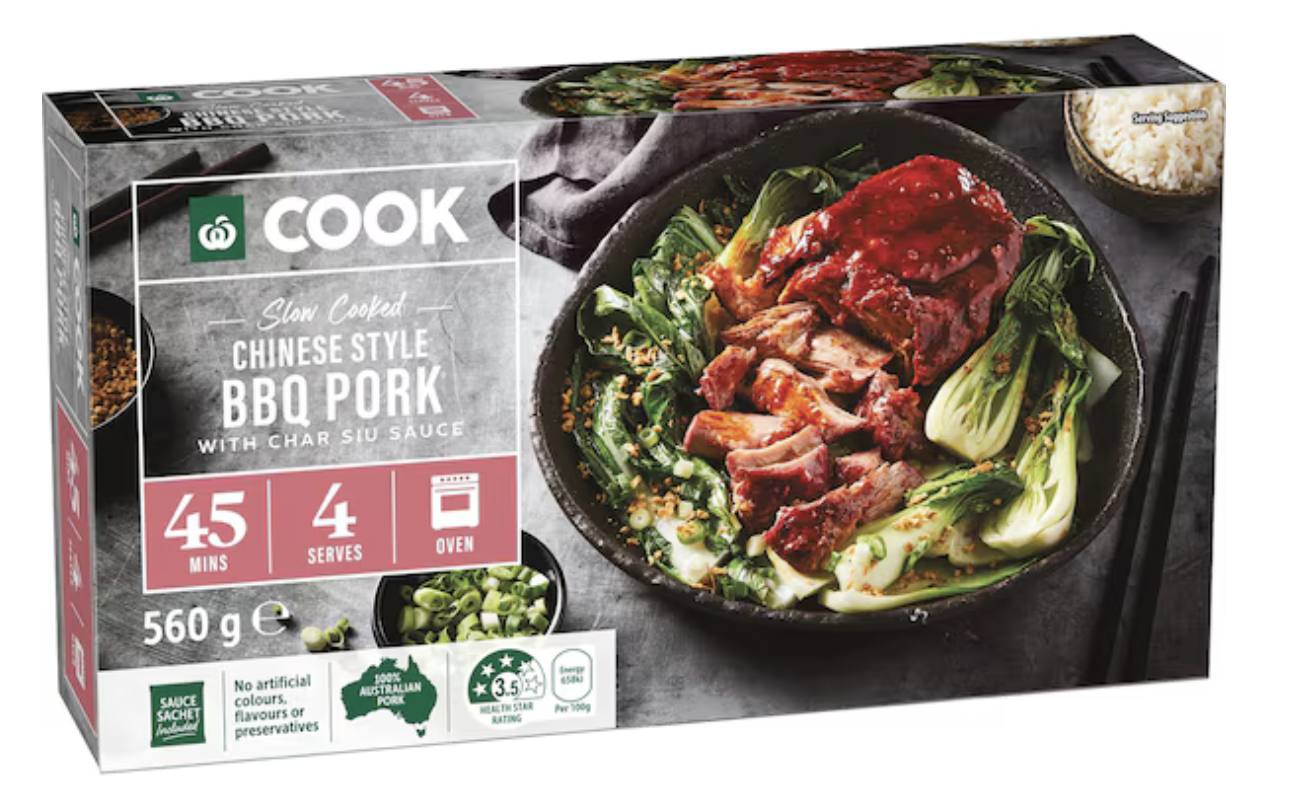
It is specifically designed to use up leftover meat (eg after a roast). So it’s great for leftover chicken or whatever. Don’t have leftovers? I love these roasts from Woollies, which are a great size for two adults but cost around $15 each. The pork was nicer than the beef in the salad. It could be really handy for a single person, who could cook a roast one night and Crunchy Noodle Salad the next night with the leftover meat.

Three people in my family like this salad, so I add roasted salted peanuts as well to fill it out. They are excellent and work really well in the symphony of flavours.
The dressing is super easy, super popular with kids, and is delicious with many things (salad, meat, dumplings, etc).
Accessibility
*There’s a fair bit of chopping involved, so if standing up is difficult you can either set up at a table or prepare things bit by bit over several hours (sitting down in between short bursts of work).
*This recipe is extremely flexible (handy for food intolerances and preferences) but I do feel that spring onions (or red onions) and mint are essential because of their distinctive pops of flavour. You may like something with a very vinegary taste instead (like pickled capers). Celery would go great.
*The fattiness is highly adjustable. Eg I put only a tiny amount of dressing on Chris’s meal, and I add more veggies to Tim’s meal. Instead of frying, you can put the chopped meat in a microwave for about thirty seconds with half a cup of water in the bottom of the bowl, then drain the water—that works beautifully for most leftover meat, even when you’re eating it “cold”, because it rehydrates the meat. I especially recommend doing it for cold chicken sandwiches.
*The cost can be really low (eg. with chicken or nuts or tinned fish or tofu).
*It is easy to make.
*You can easily make it vegetarian.
*You do need to cut up leftover (cooked) meat for this recipe… or you could substitute your own protein. I think tinned salmon would be divine.
*It must be eaten within an hour or the noodles go soggy, but you could otherwise make almost everything in advance. Grated carrot sometimes browns a little with oxygenation (so add it last out of the vegetables if you’re making it). The cooked meat must be fried at the last minute too, otherwise it won’t be nearly as nice.
*These quantities work well for three hungry people.
*I often cook duck, and there’s always way too much fat, so I save it specifically for this recipe.
Ingredients
1 pack Chinese style bbq pork or an equivalent amount of meat/protein
Other leftover meat eg chicken OR roasted salted peanuts OR other protein
1 tablespoon sesame seeds
2-3 tablespoons sesame oil and/or duck fat
1 cucumber
Half tin sweet corn kernels
Mint leaves (about five per person, chopped in half or thirds if they’re big).
Half a red onion or 1 bunch of spring onions
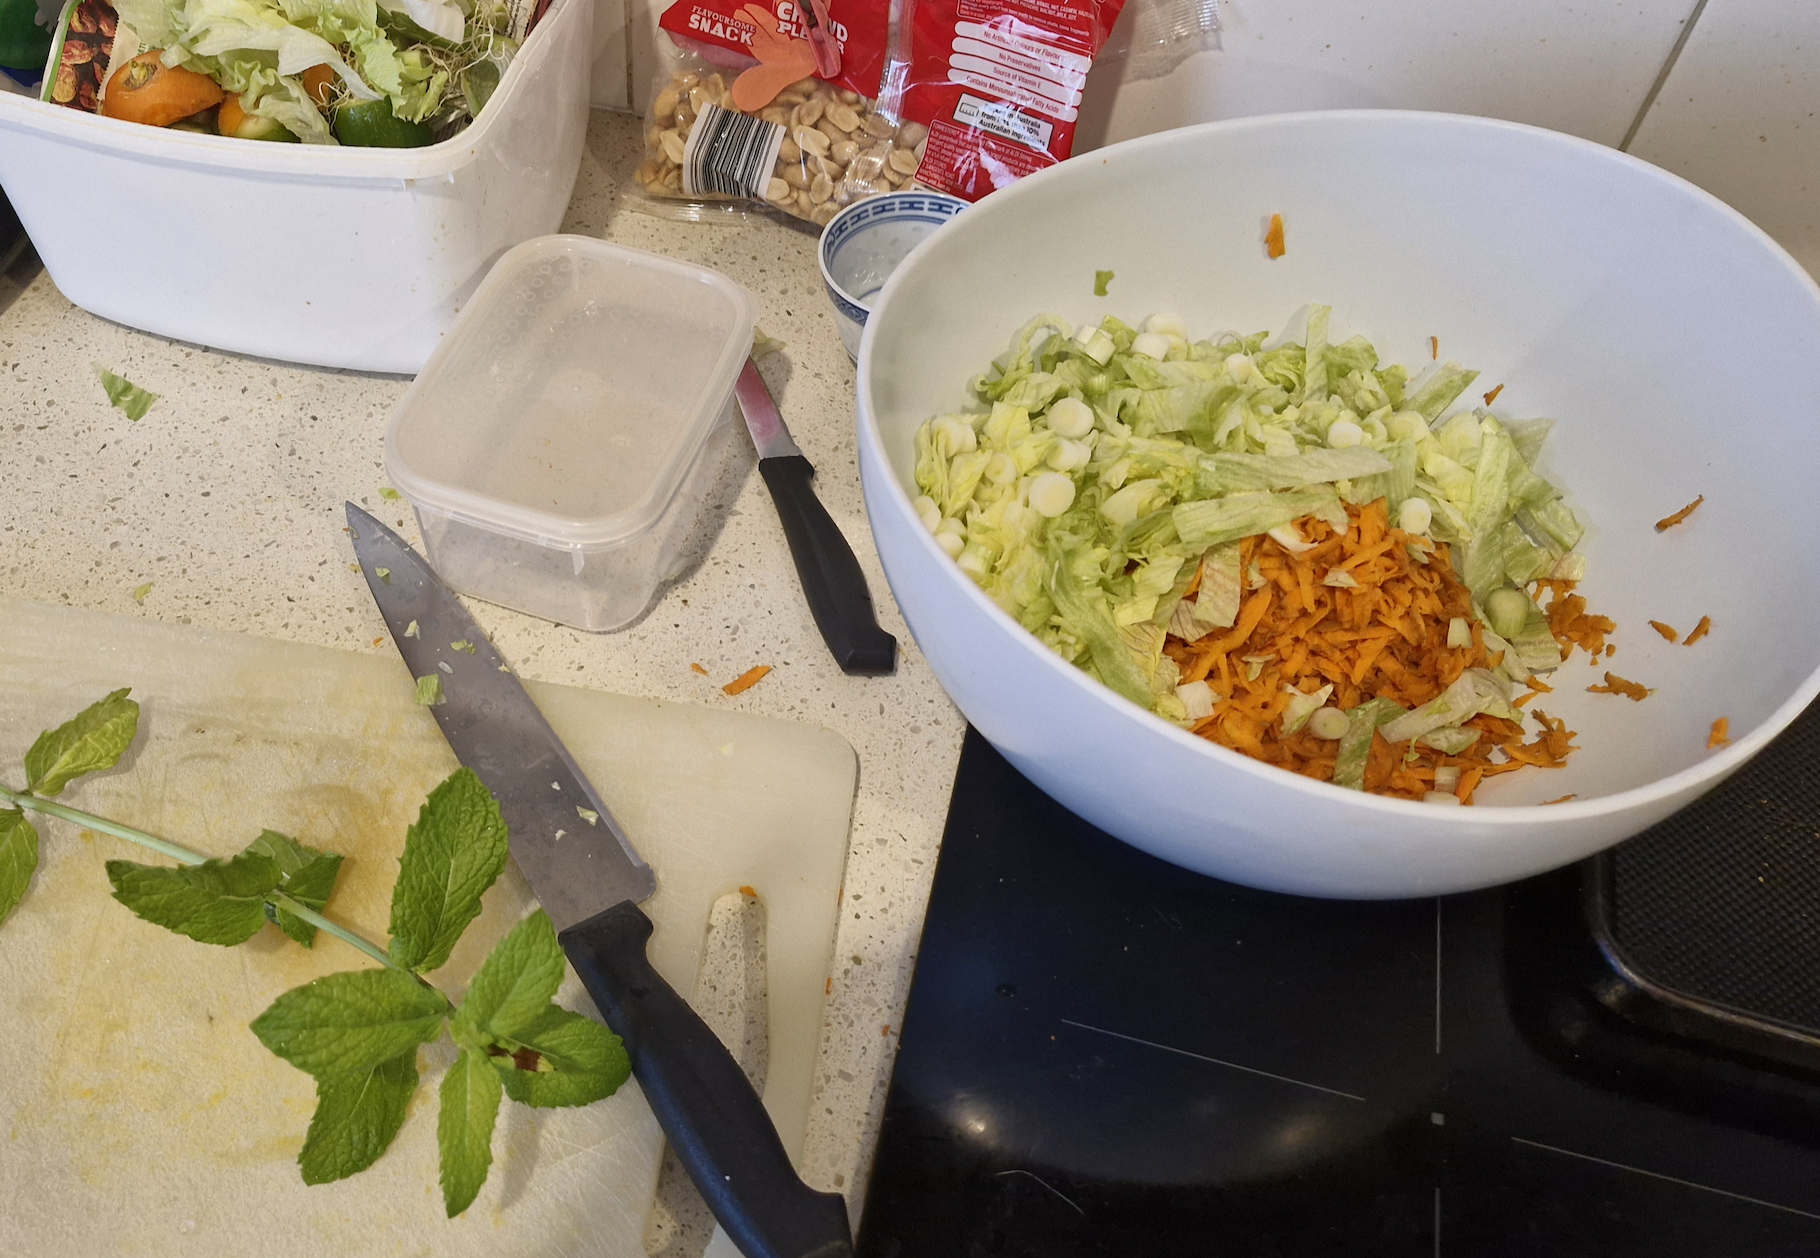
A quarter of an iceberg lettuce
1-2 carrots
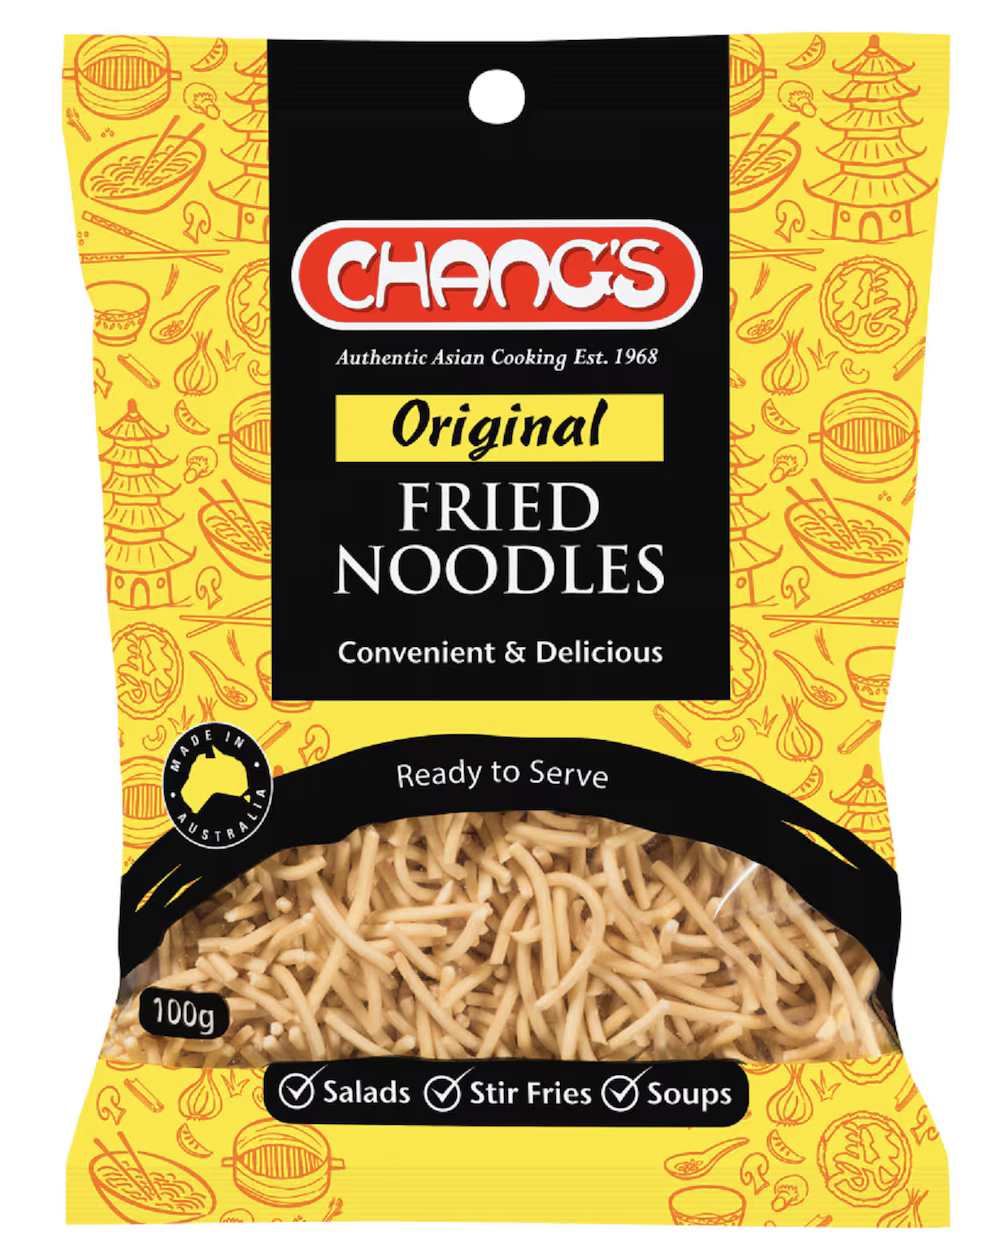
1-2 packs Chang’s fried noodles
Half cup mayo
1/4 cup maple syrup
Method
- Cook the pork and let it cool in the oven for twenty minutes. (I cook it in the morning then put it in the fridge, but you could skip the frying stage and just cook it in the evening and chop it up after cooling for ten minutes in the oven.)
- Cut cucumber into semi-circles, lay them out flat-ish, and scatter salt on top. Leave them for 10 minutes, then pat them dry with paper towels and put them in a big salad bowl. (Cucumber with ‘sweat’ and get soggy if you don’t do this.)
- Drain corn, wash and cut mint leaves, cut onion/s, cut lettuce into strips, then grate carrot/s. Put all veggies/leaves into the big bowl with 1-2 tablespoons of sesame oil and/or duck fat. Mix so everything has a slight coating of fat.
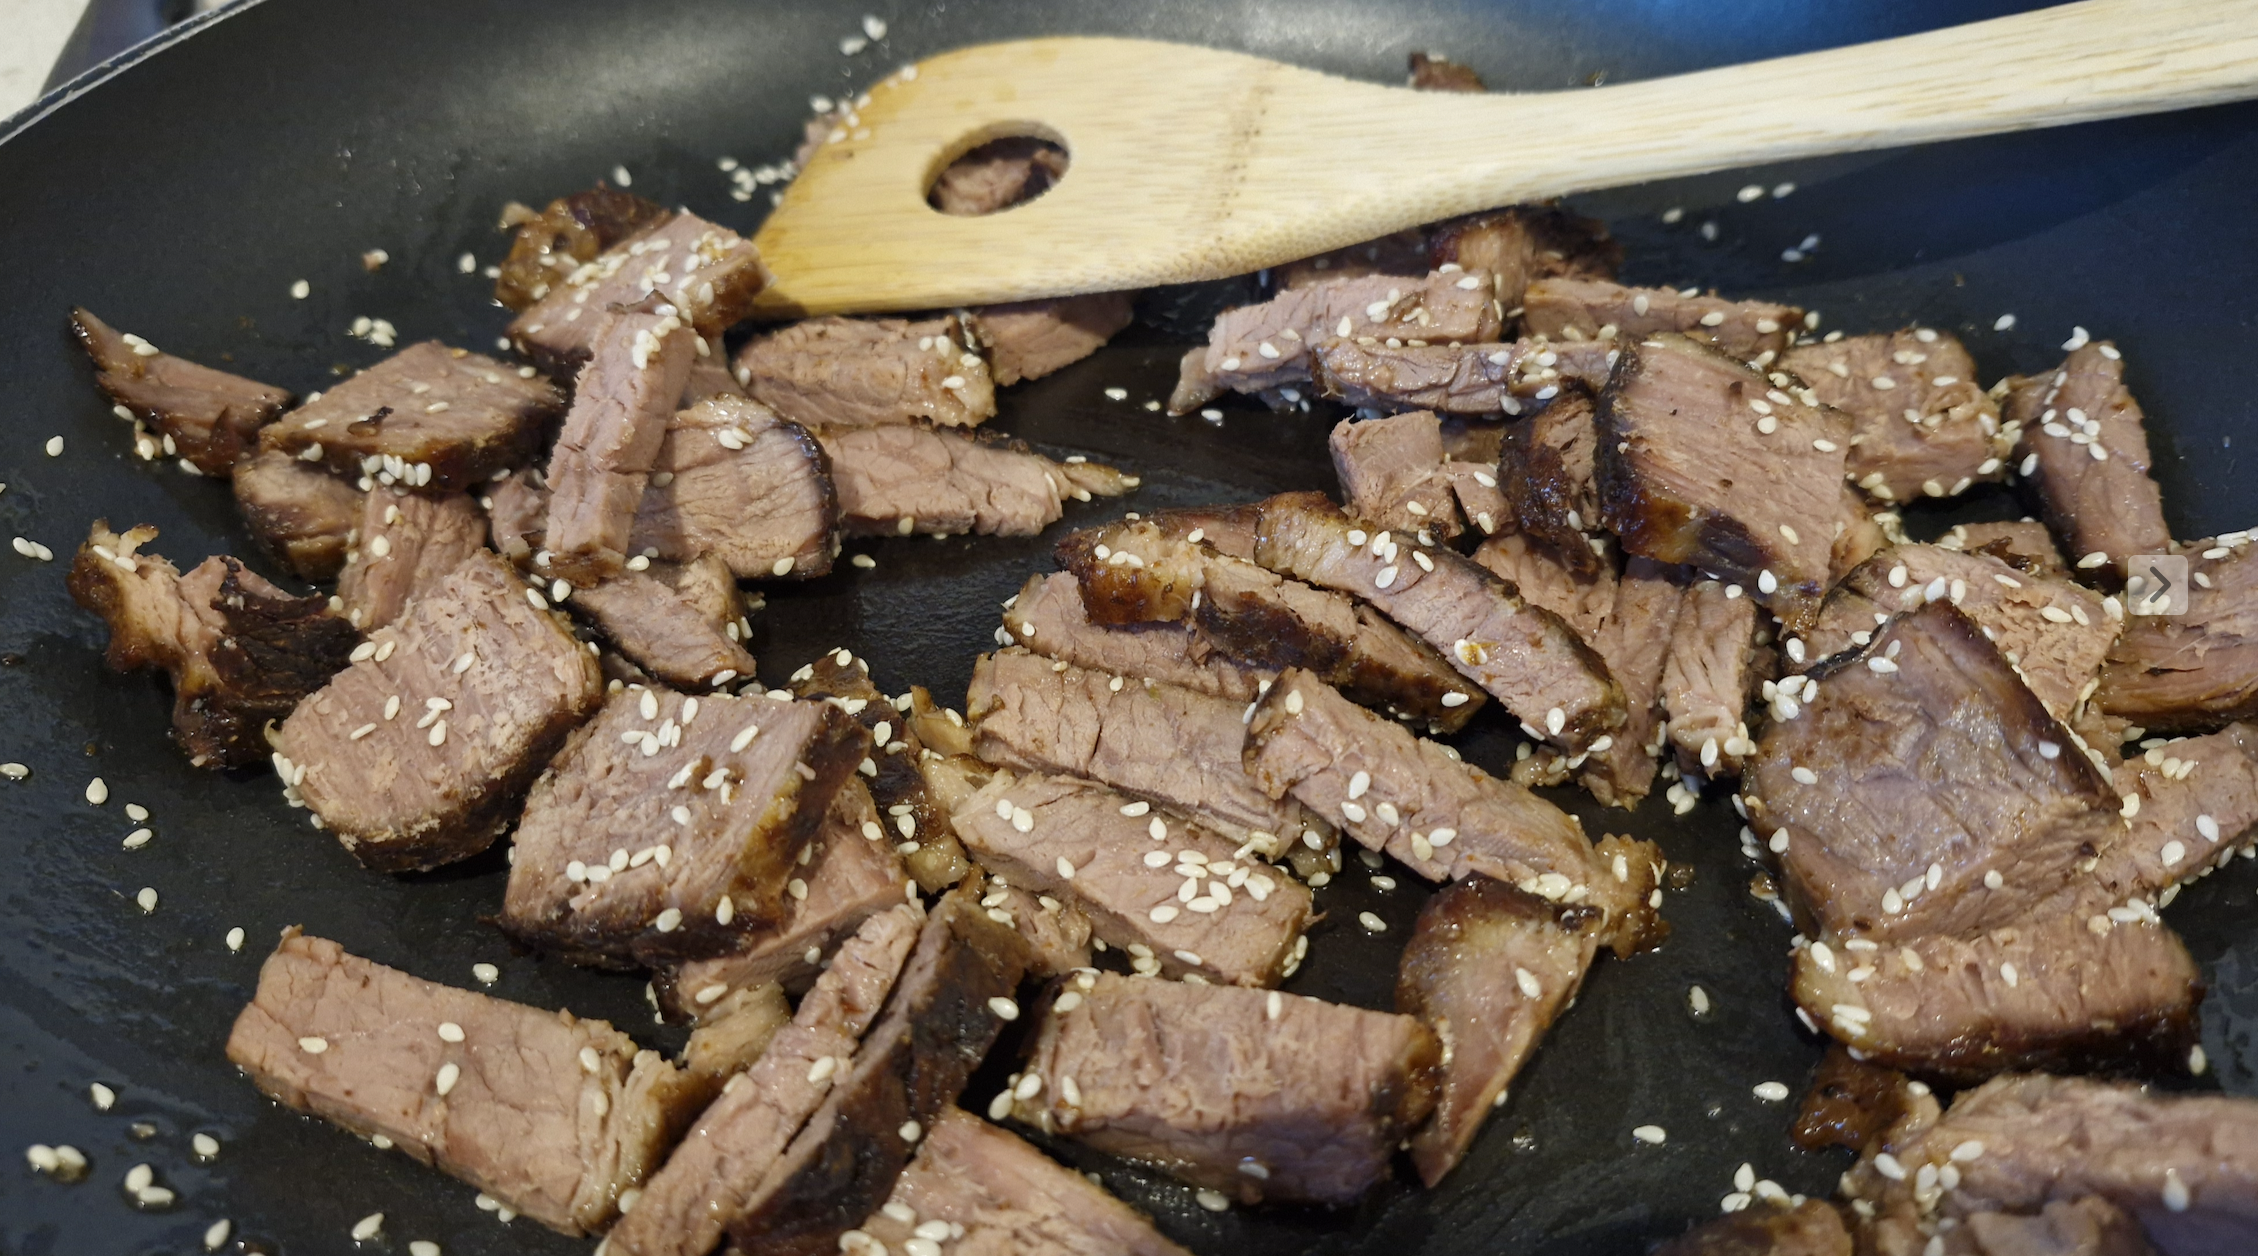
- Chop/shred all meat into bite size pieces or smaller (remove any charred or too-fatty bits). Put 1 tablespoon of oil or duck fat into a large fry pan on heat setting 8. Fry meat for a few minutes, scattering sesame seeds on top, then reduce heat to very low until ready.
- While meat is reheating, mix mayo and maple syrup into a sweet-and-sour sauce/dressing.
- Mix all the meat and noodles (and peanuts) into the big bowl, serve in individual bowls with sweet-and-sour sauce drizzled over the top.
Semi-Balinese Duck
I went to Indonesia for six months when I was eighteen years old, and literally the only food I enjoyed while I was there was pancakes (martabak/terang bulan and kue dadar).
But in 2024 I went with my family and I fell in love with the food SO HARD, especially Bebek Betutu. I even loved the sambal (chili sauce) served with it (presumably a very mild tourist-friendly version). Bebek Betutu is often translated as “Twice-Cooked Duck” as the duck is cooked for a delicious moist inside plus a crispy outside. I ate it as often as I could, in as many different places as I could. Usually the crispy outside was perfection but the inside varied, so I assume people usually deep-fry it. This recipe doesn’t. I have been working on my own version of Balinese duck which is somewhat non-authentic but still very nice.

Accessibility:
*This is expensive. Two duck breasts at Woollies cost around $15 (and I buy two per person). Spring onions are super expensive too.
*Some skill is required. Having a good nose and steady nerves is very helpful. If you forget about your duck at the wrong moment it’ll be ruined. Also, the duck fat will spatter.
*Very little standing up is needed, so that’s good!
*This doesn’t have many ingredients (the only true essentials are duck and rice) so it can be adjusted easily for food intolerance.
*This is very high in fat, and low in veggies. You can adjust it, of course.
*The curry paste and the turmeric (and everything that touches either of them) are VERY yellow so there’s a high chance of staining, especially if you’re uncoordinated and/or forgetful.
*It is barely spicy the way I make it.
*You need a cast iron frypan. Stainless steel simply doesn’t work. A thermomix is handy but not essential.
*It is difficult to cook this without touching the raw meat, but a determined person could probably manage with tongs.
*If you want to cook more than four duck breasts at a time, you will need another pan and hot plate.
*The finished duck will be slightly pink inside in places, and may leak some juice when it is cut. Double the oven time if you want it all brown (but it won’t be as tender). It should be blushing pink, not bright pink. Unlike chicken, you don’t have to cook every scrap of colour out of duck.
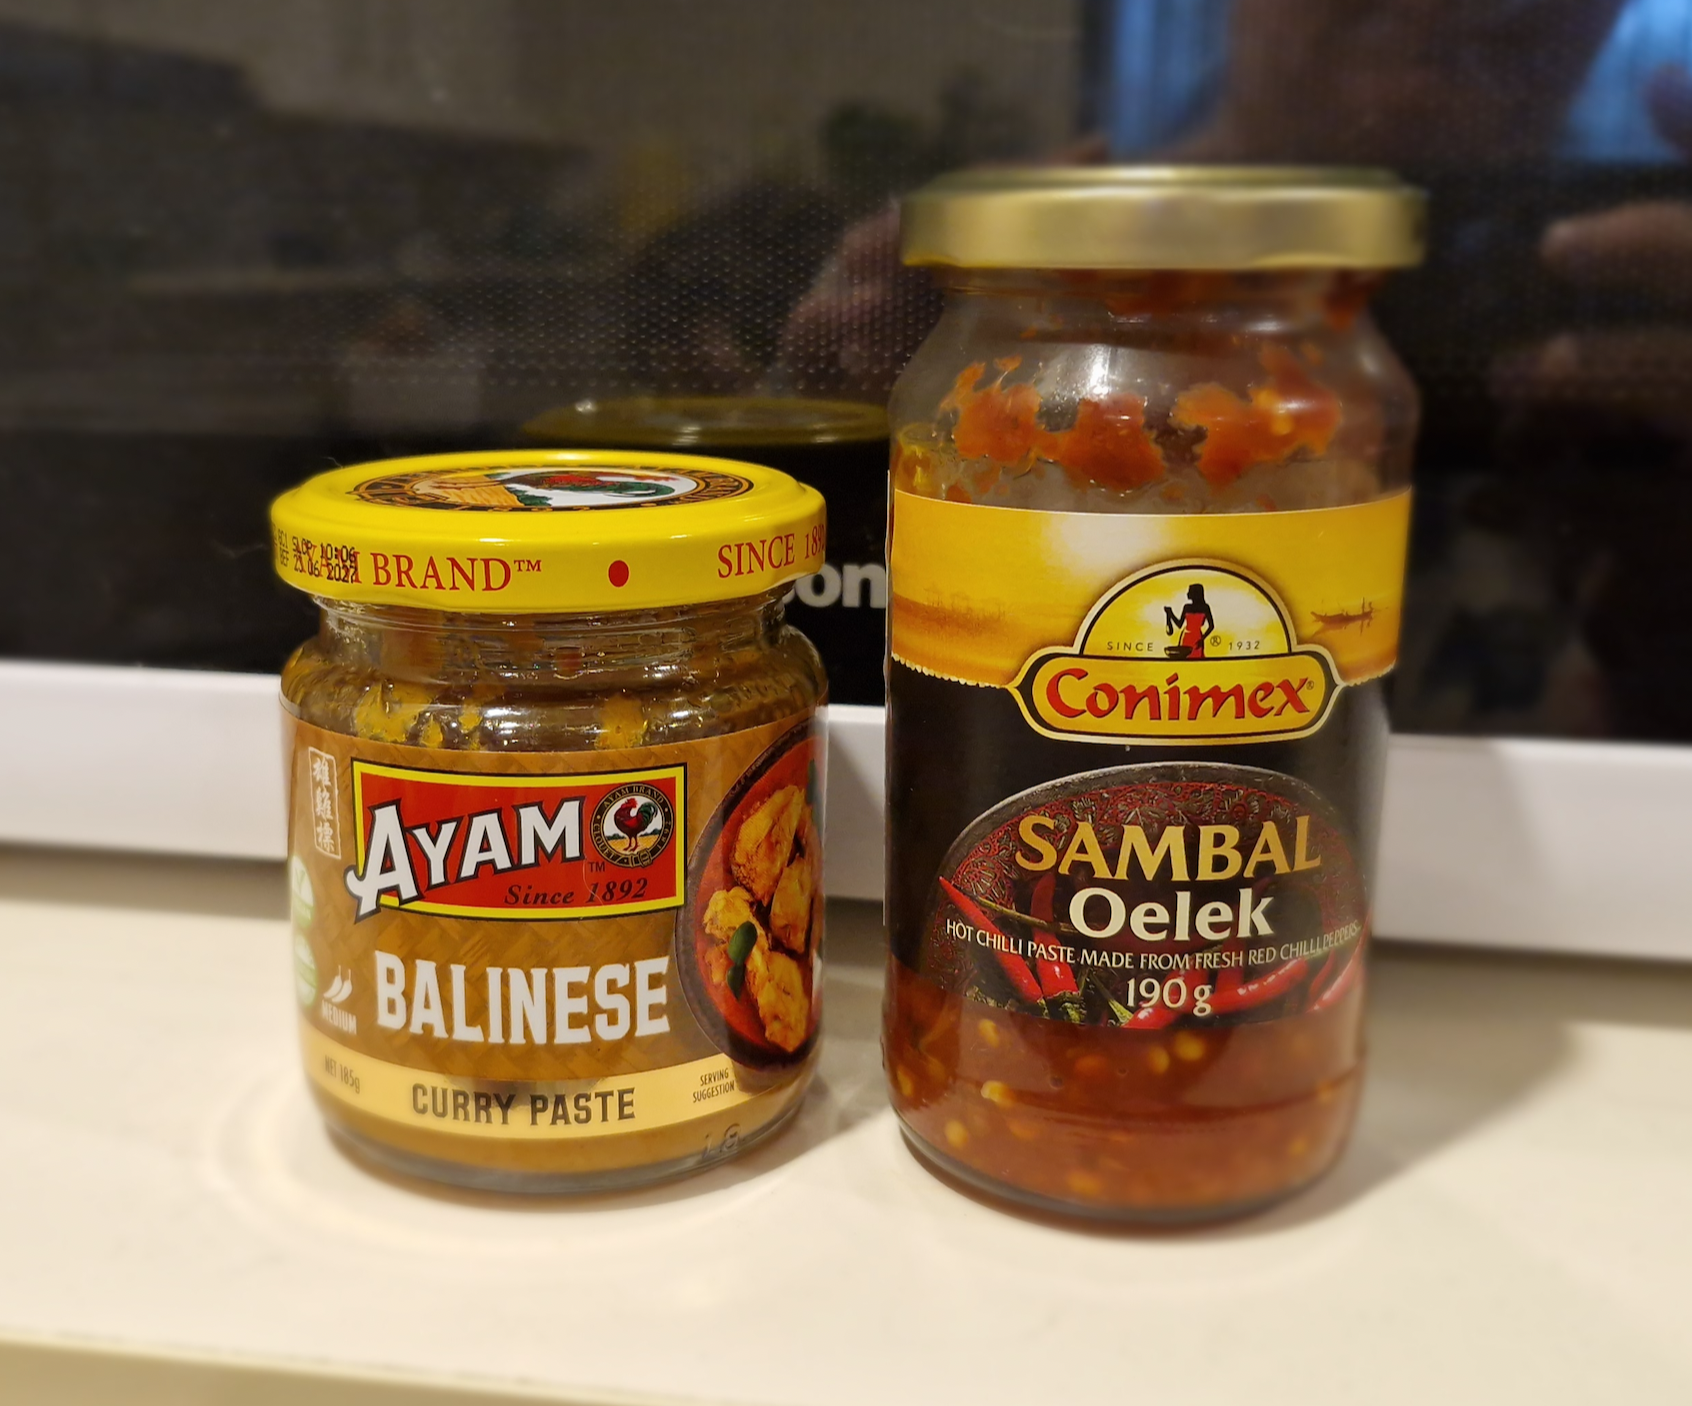
*Everything is available at Woollies, but if you want to be more authentic/spicy you can buy Sambal Oelek online (I mix one part sambal with four parts coconut milk then reduce it over low heat—that makes it milder).
Ingredients:
Duck breasts, two per person.
Rice.
Ayam brand “Balinese curry” jar.
A tin of coconut milk.
1 teaspoon turmeric (optional).
Fresh or fried spring onions/shallots/garlic/onion (I like fresh spring onions best).
1 cucumber (optional).
1 tablespoon sweet soy sauce aka Kecap Manis (optional).
1 tsp brown sugar (very optional).
Method:
- Let the duck sit out of the fridge (in the packet) for about an hour before you start.
2. Preheat the oven to 120 degrees Celsius.
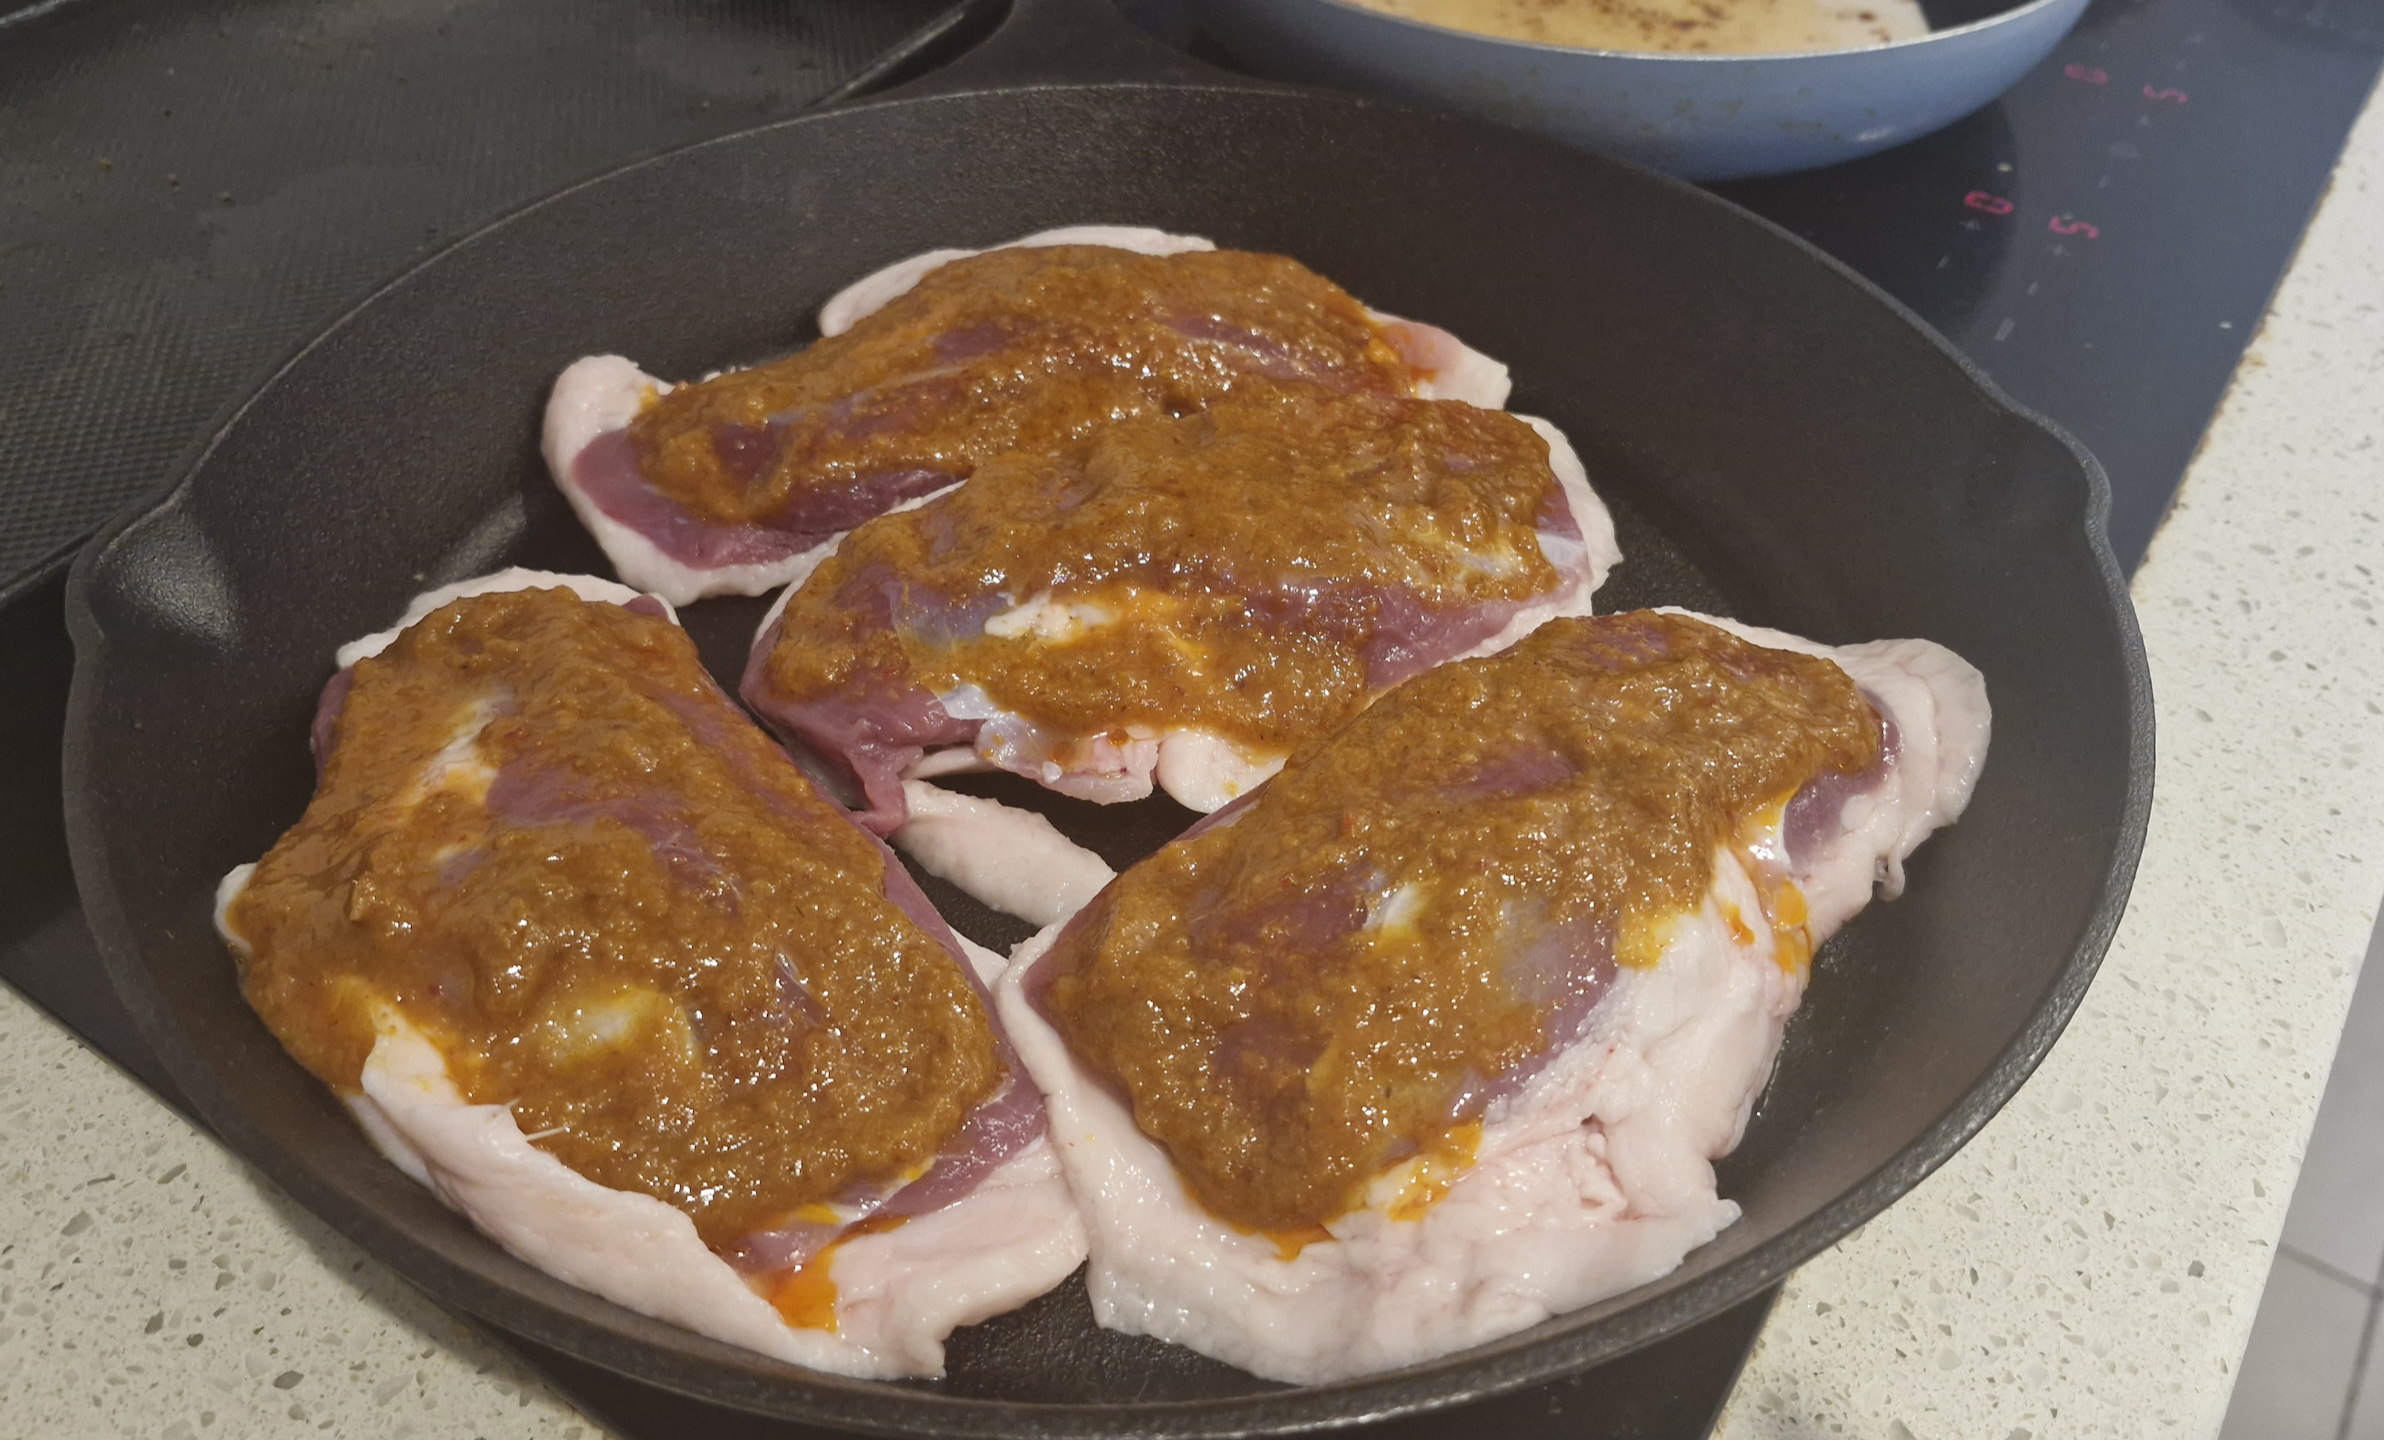
3. Pat dry both sides of the duck breasts with paper towels. Use a sharp knife to score lines into the fat side of each piece, being careful not to cut the non-fat part at all. Lay them in a room temperature cast iron pan, with no oil or anything, skin side down.

4. Turn on to Heat 4 for 25 minutes. Do NOT move the duck. At all. It needs to form a crust. After about 5 minutes, the fat will start to render. Put a teaspoon of the curry sauce on each piece at that stage.
My biggest issue with this dish is that my hot plate isn’t big enough to heat the whole pan evenly. I try to squash them close together in the centre of the pan (they will shrink in cooking anyway, making space between them). I can also move the pan around to try to cook things evenly.
Lots of recipes recommend putting a second frypan on top of the duck to try to keep the fat flat so it’s all touching the cast iron pan and doesn’t go rubbery. I could never figure out a way that worked.
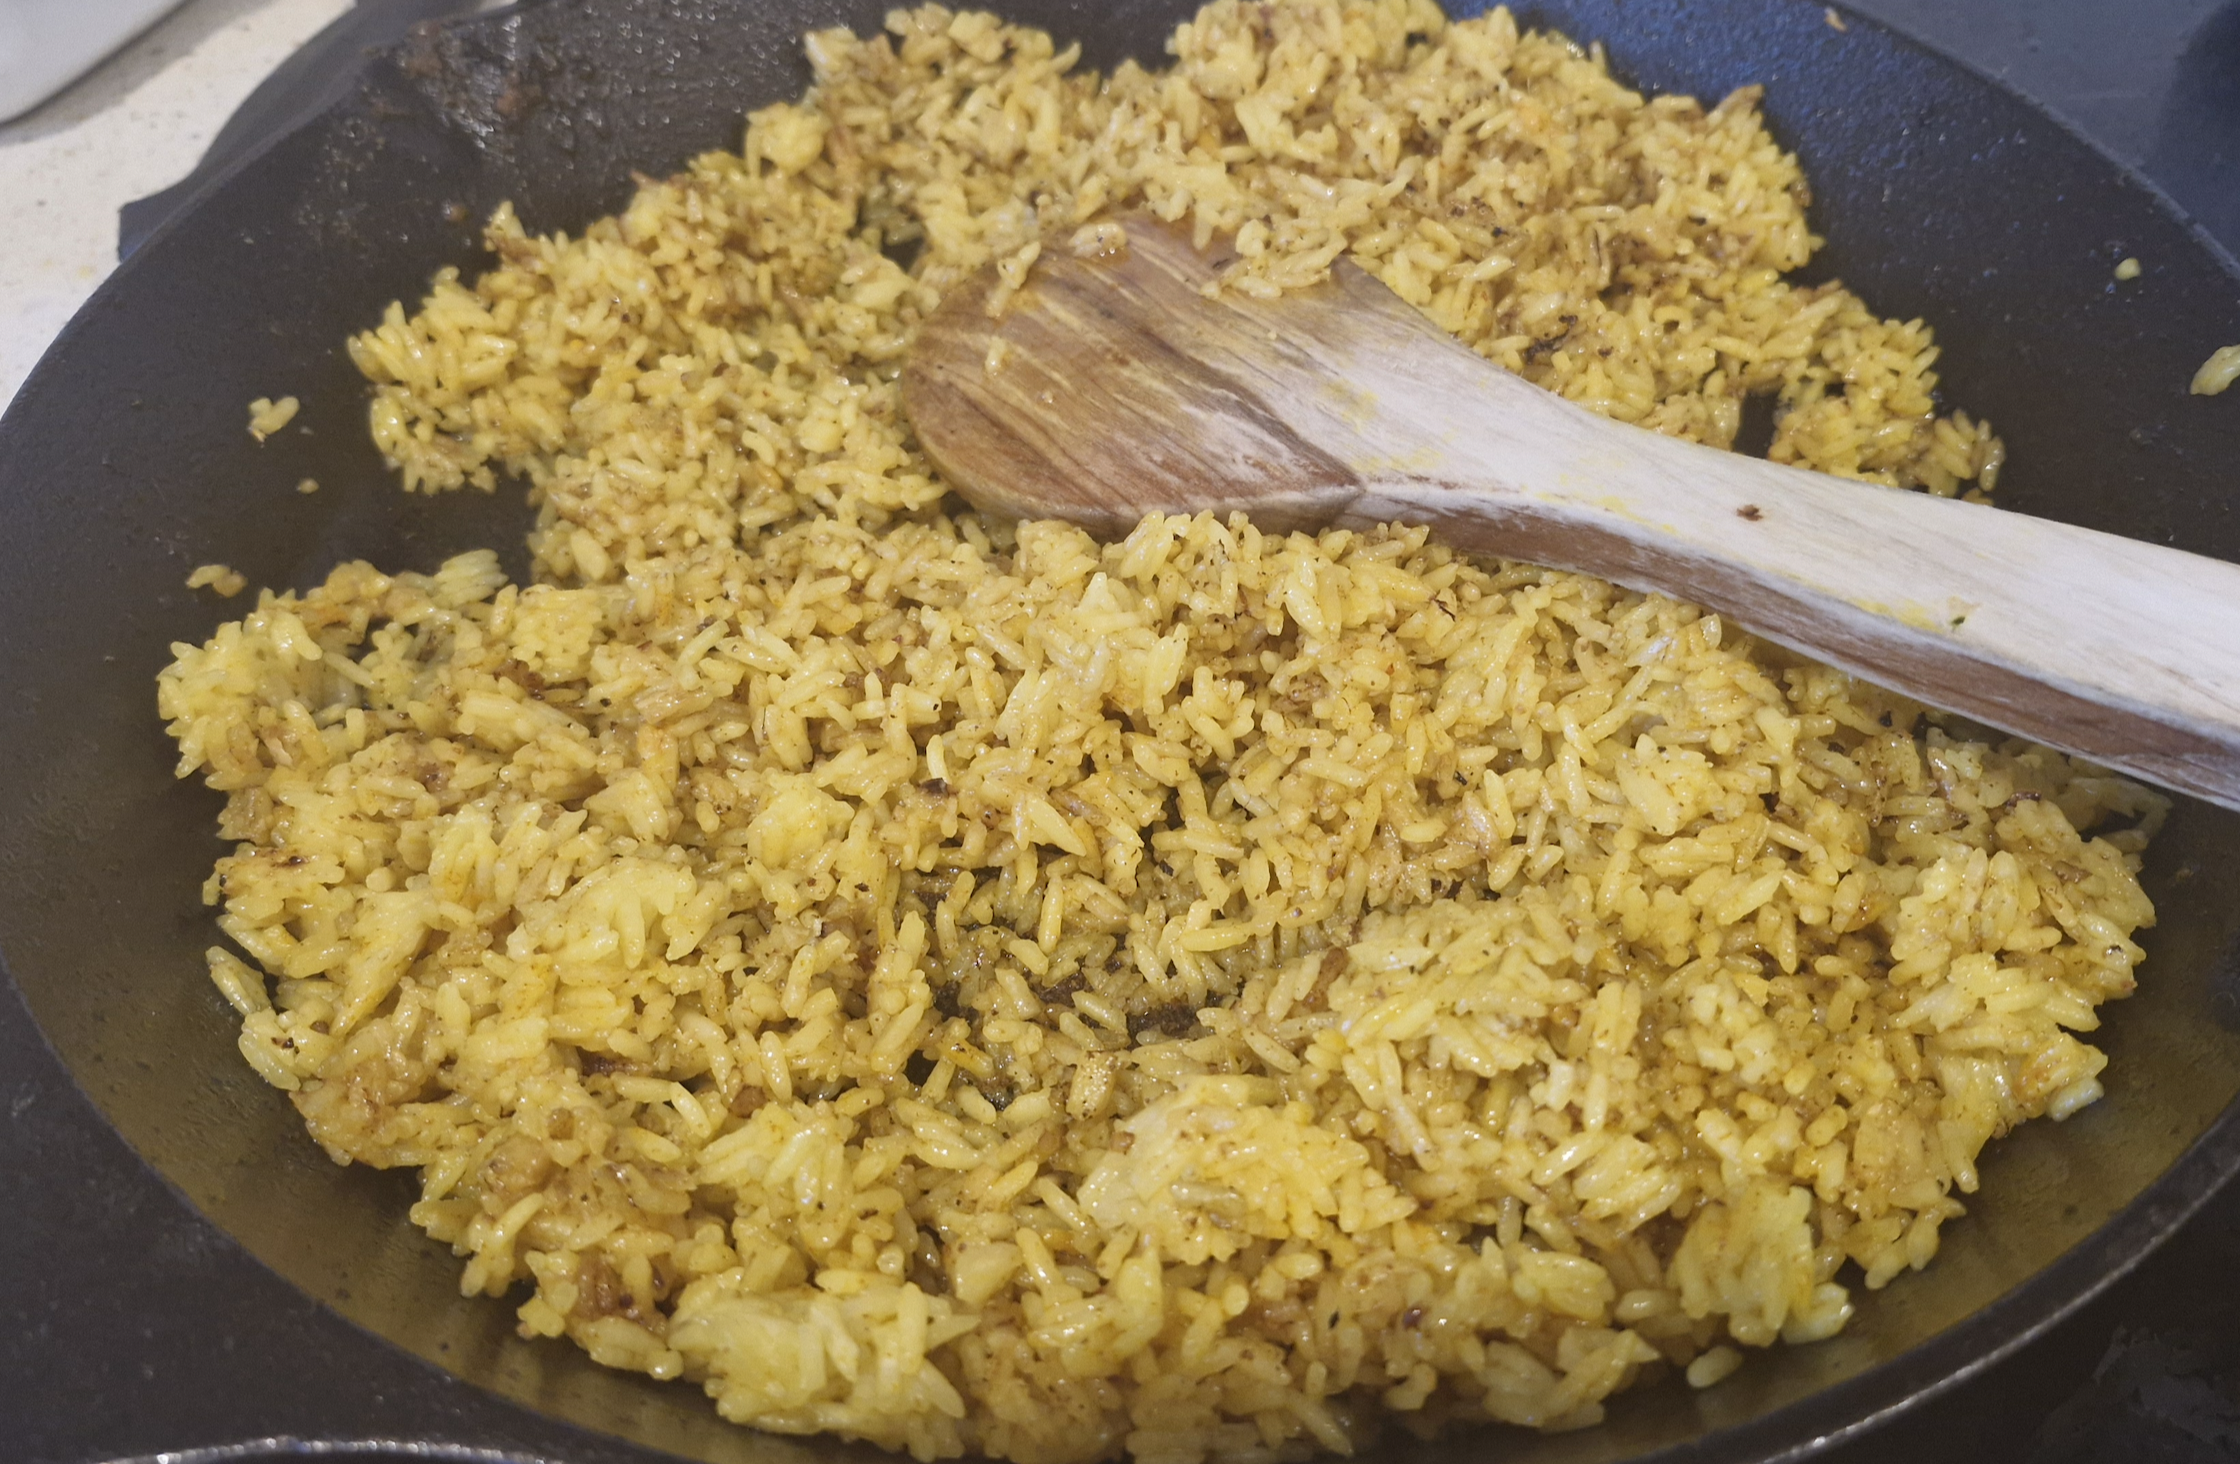
5. Cook the rice, but substitute the coconut milk for some of the water, and mix the teaspoon of turmeric into the uncooked rice. If you are NOT using a thermomix, set aside a couple of tablespoons of coconut milk for the sauce. (If you are using a thermomix, you will use the liquid in the bottom of the jug for the sauce but be warned! It will spit yellow liquid in all directions, so I cover the nearby area with tea-towels.)
6. Chop your onion/garlic (if using fresh onion/garlic) and cucumber.
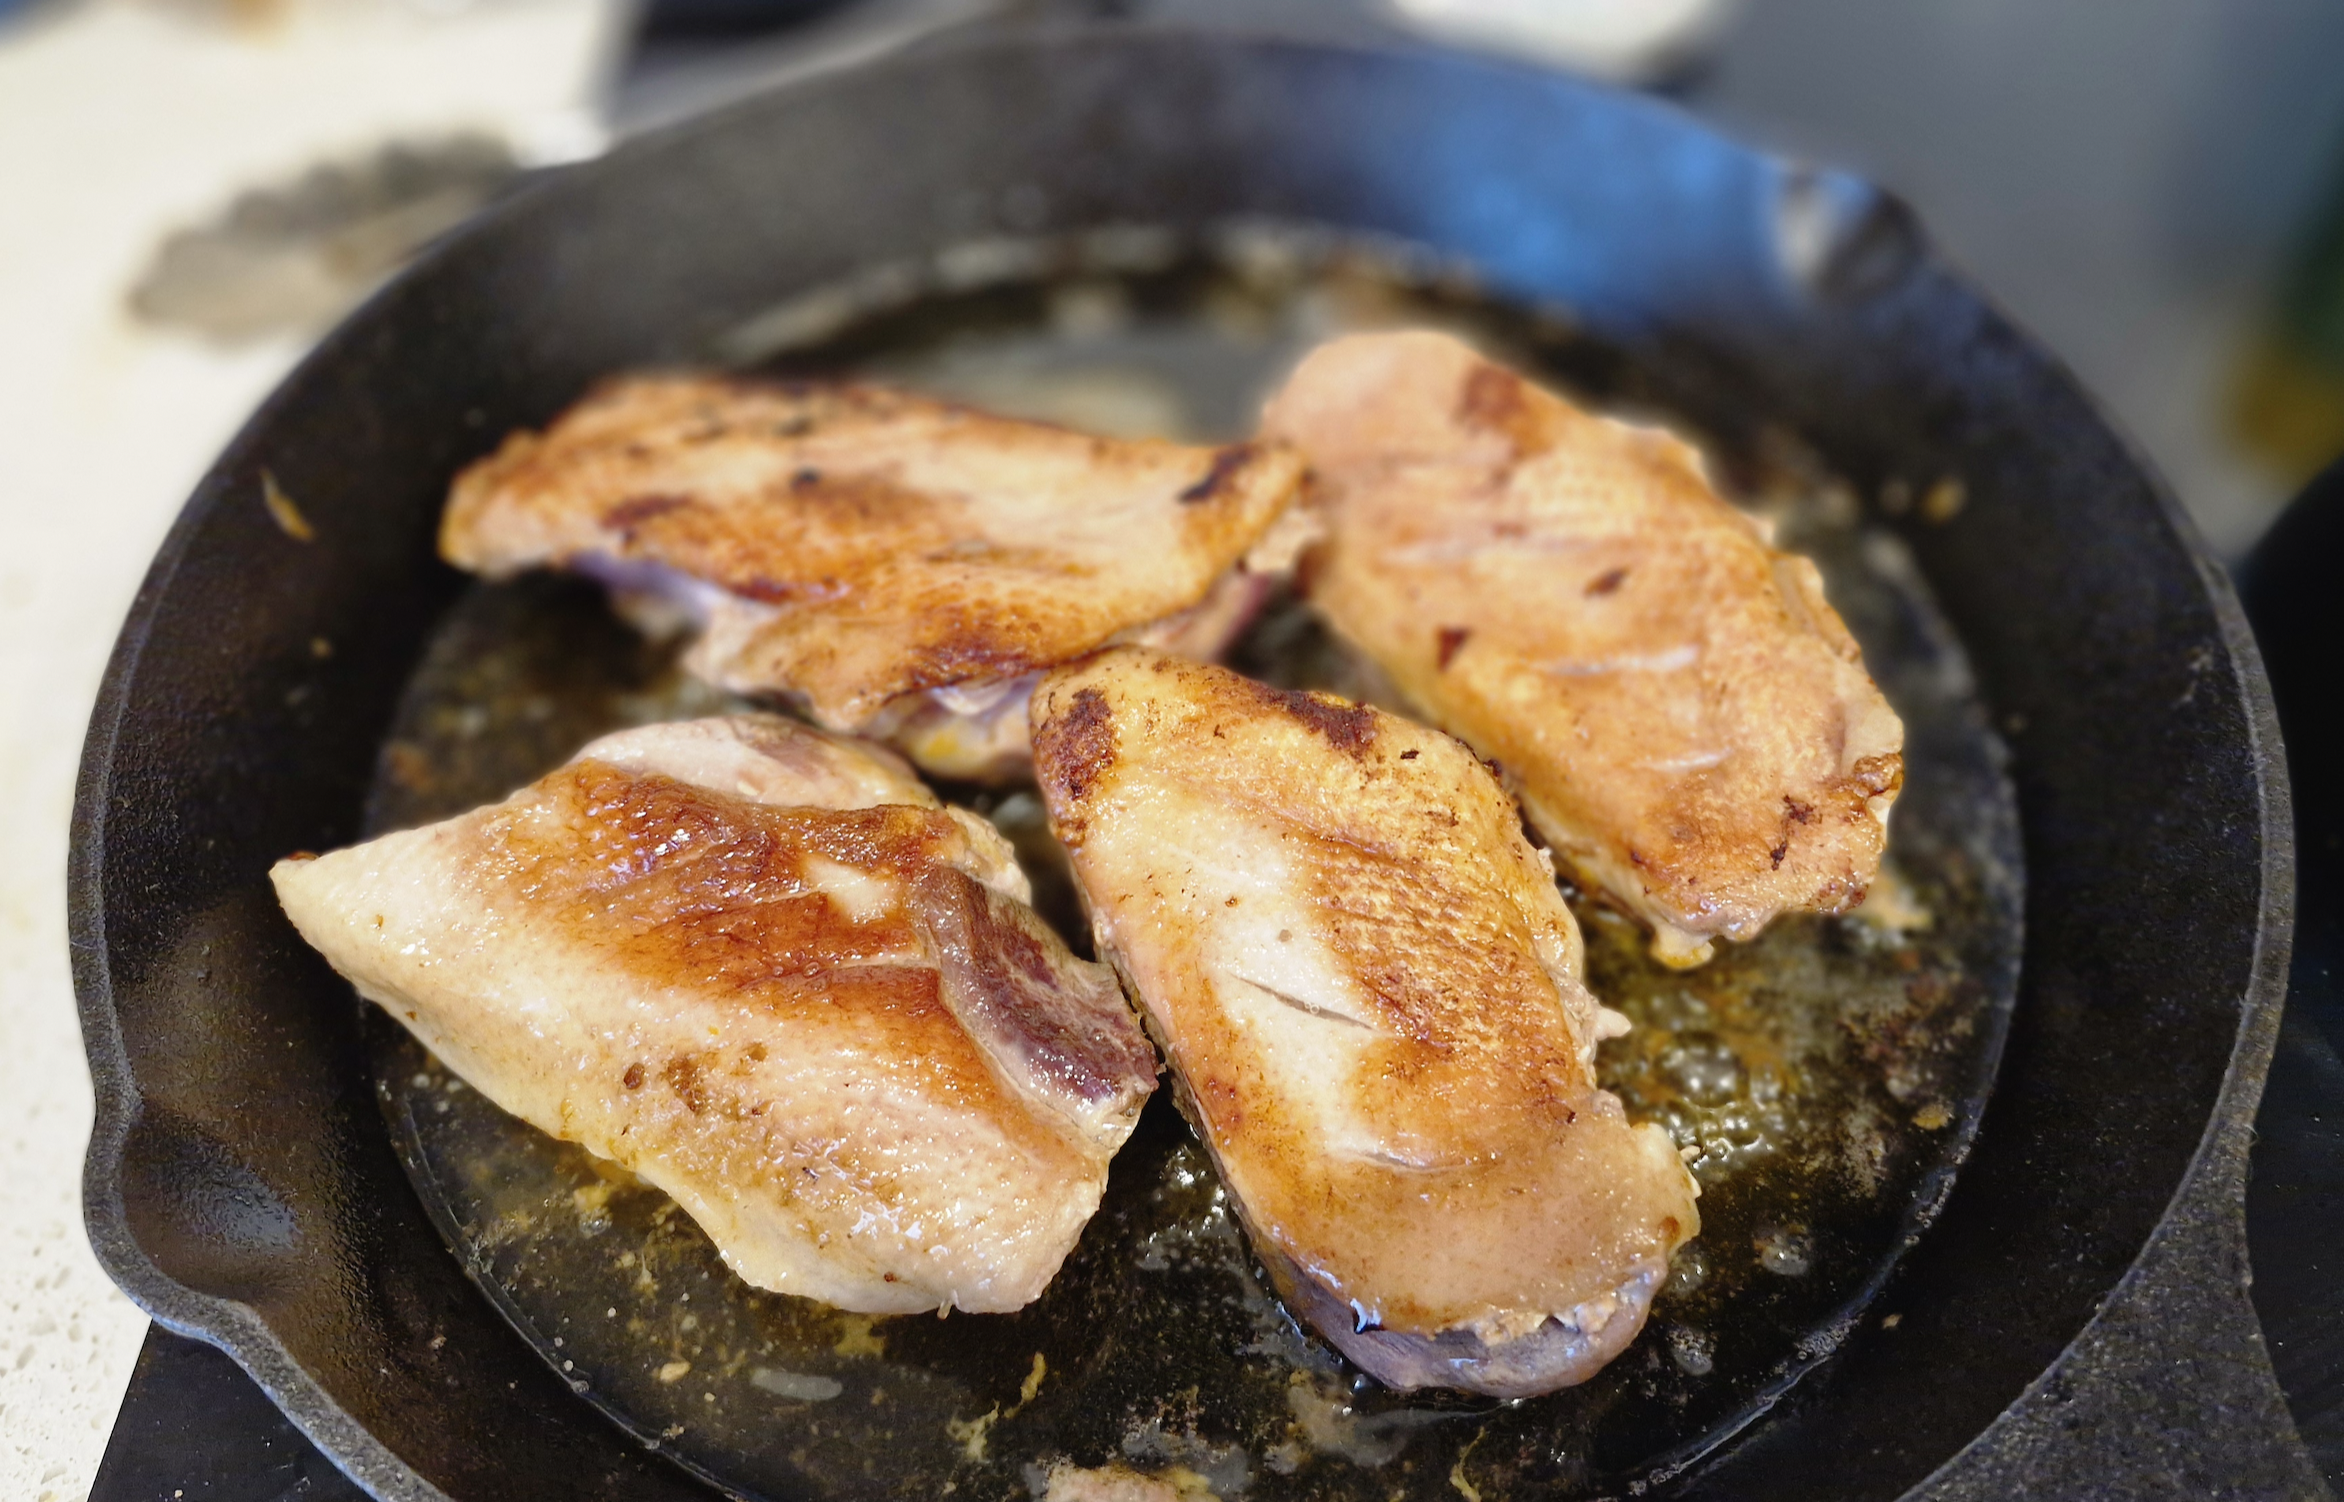
7. When the duck has been cooking for 25 minutes, turn the heat up to 6 for another 3 minutes.
8. Turn the heat back down to 4 and flip the duck breasts to seal the non-skin side. 3 minutes only.
If you like, spread one teaspoon of brown sugar over one duck breast. This is yum, and is my tribute to the Caramelised Bebek Betutu at the Indus Restaurant in Ubud. They had a version that was both crispy and sweet on the outside. It. Was. Incredible.
9. Put the duck breasts on a tray in the oven for 10 minutes. When they are done, turn the oven off but leave the duck in the oven with the door closed for at least 5 minutes (I think 10 is better).
10. Pour most of the duck fat from the cast iron pan into a freezer-safe glass container, leaving a bit in the pan. Fry your garlic/onion in the remaining fat (if it’s fresh onion/garlic; otherwise sprinkle your inion/garlic on the rice when you plate it up), then add the rice and sweet soy sauce. Return a tablespoon of the fat to the rice, and don’t stir it too much once you’ve mixed it all together. If you get it just right, you’ll get crispy rice.
I think the rice would be slightly better if the freshly-fried onion/garlic was removed and then added back at the last minute.
11. Get another tablespoon of the fat to make the sauce. Mix it with the remaining coconut milk (or the yellow liquid from the thermomix jug) and add at least one tablespoon of the curry sauce. Heat it and keep mixing (I use a smaller frypan so it reduces a little).
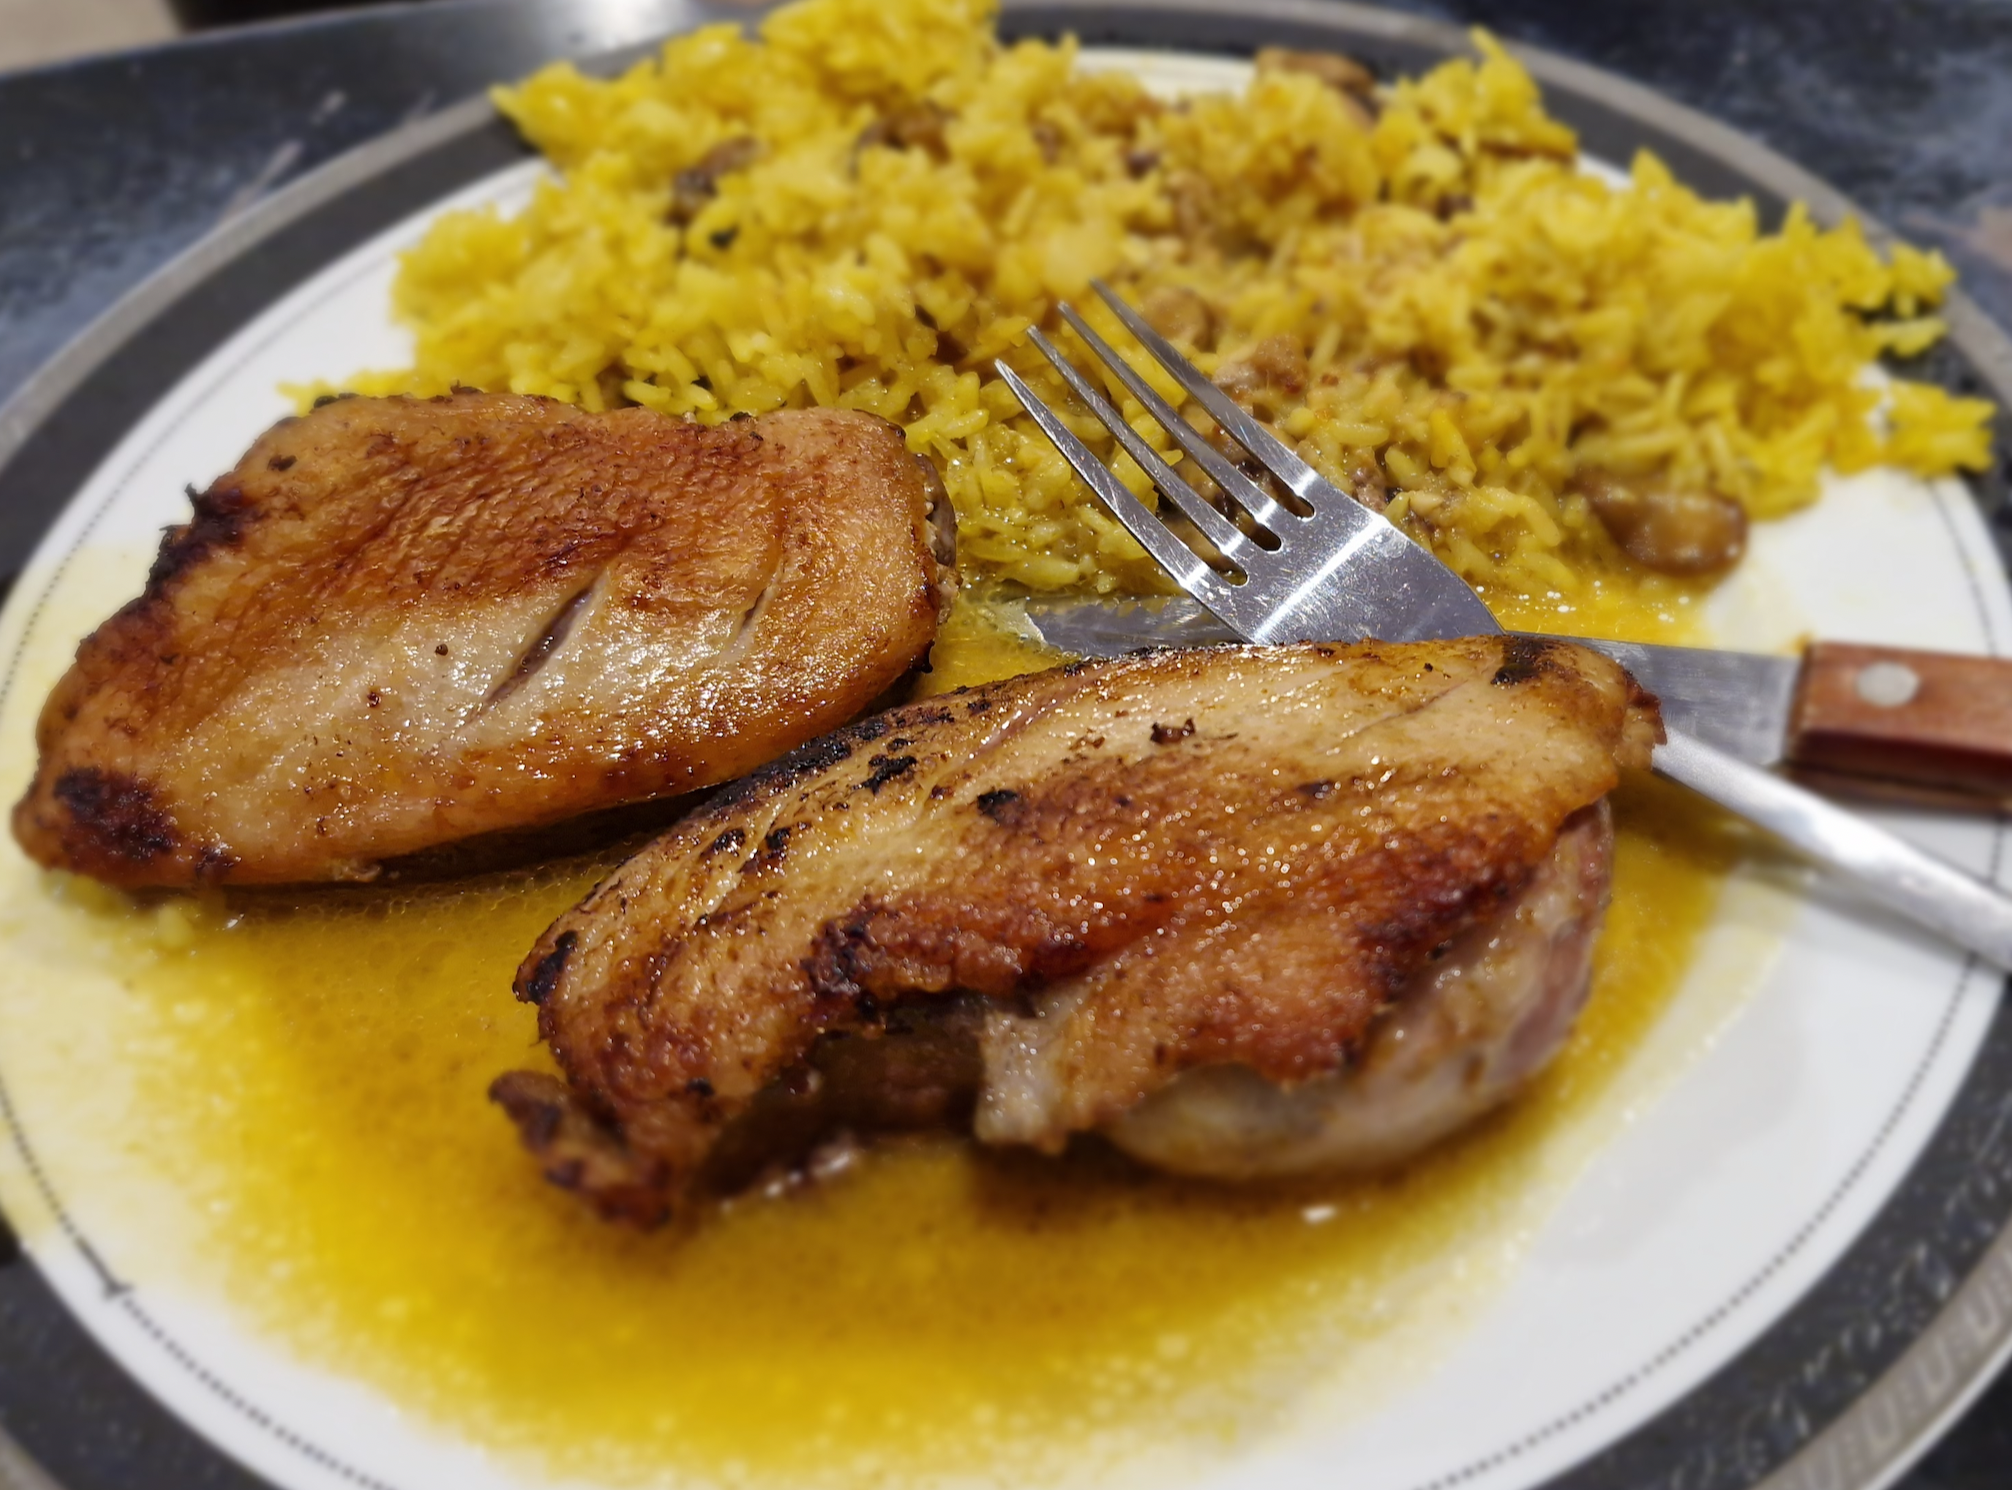
12. Arrange rice, chopped fresh cucumber, and duck on plates, then pour over the sauce.
Keep the leftover duck fat in your fridge or freezer. It is a brilliant addition to many recipes (specifically, the Crunchy Noodle Salad I’ll be posting about very soon—or any salad that you’re serving immediately). Or instead of oil for almost anything. There will be more fat in your oven tray, so add that fat to the rest. I’m told it has amazing health benefits. It will solidify when it cools, but you can easily heat it when you want to use it.
In this first picture, the sauce is quite different to the way I do it now.
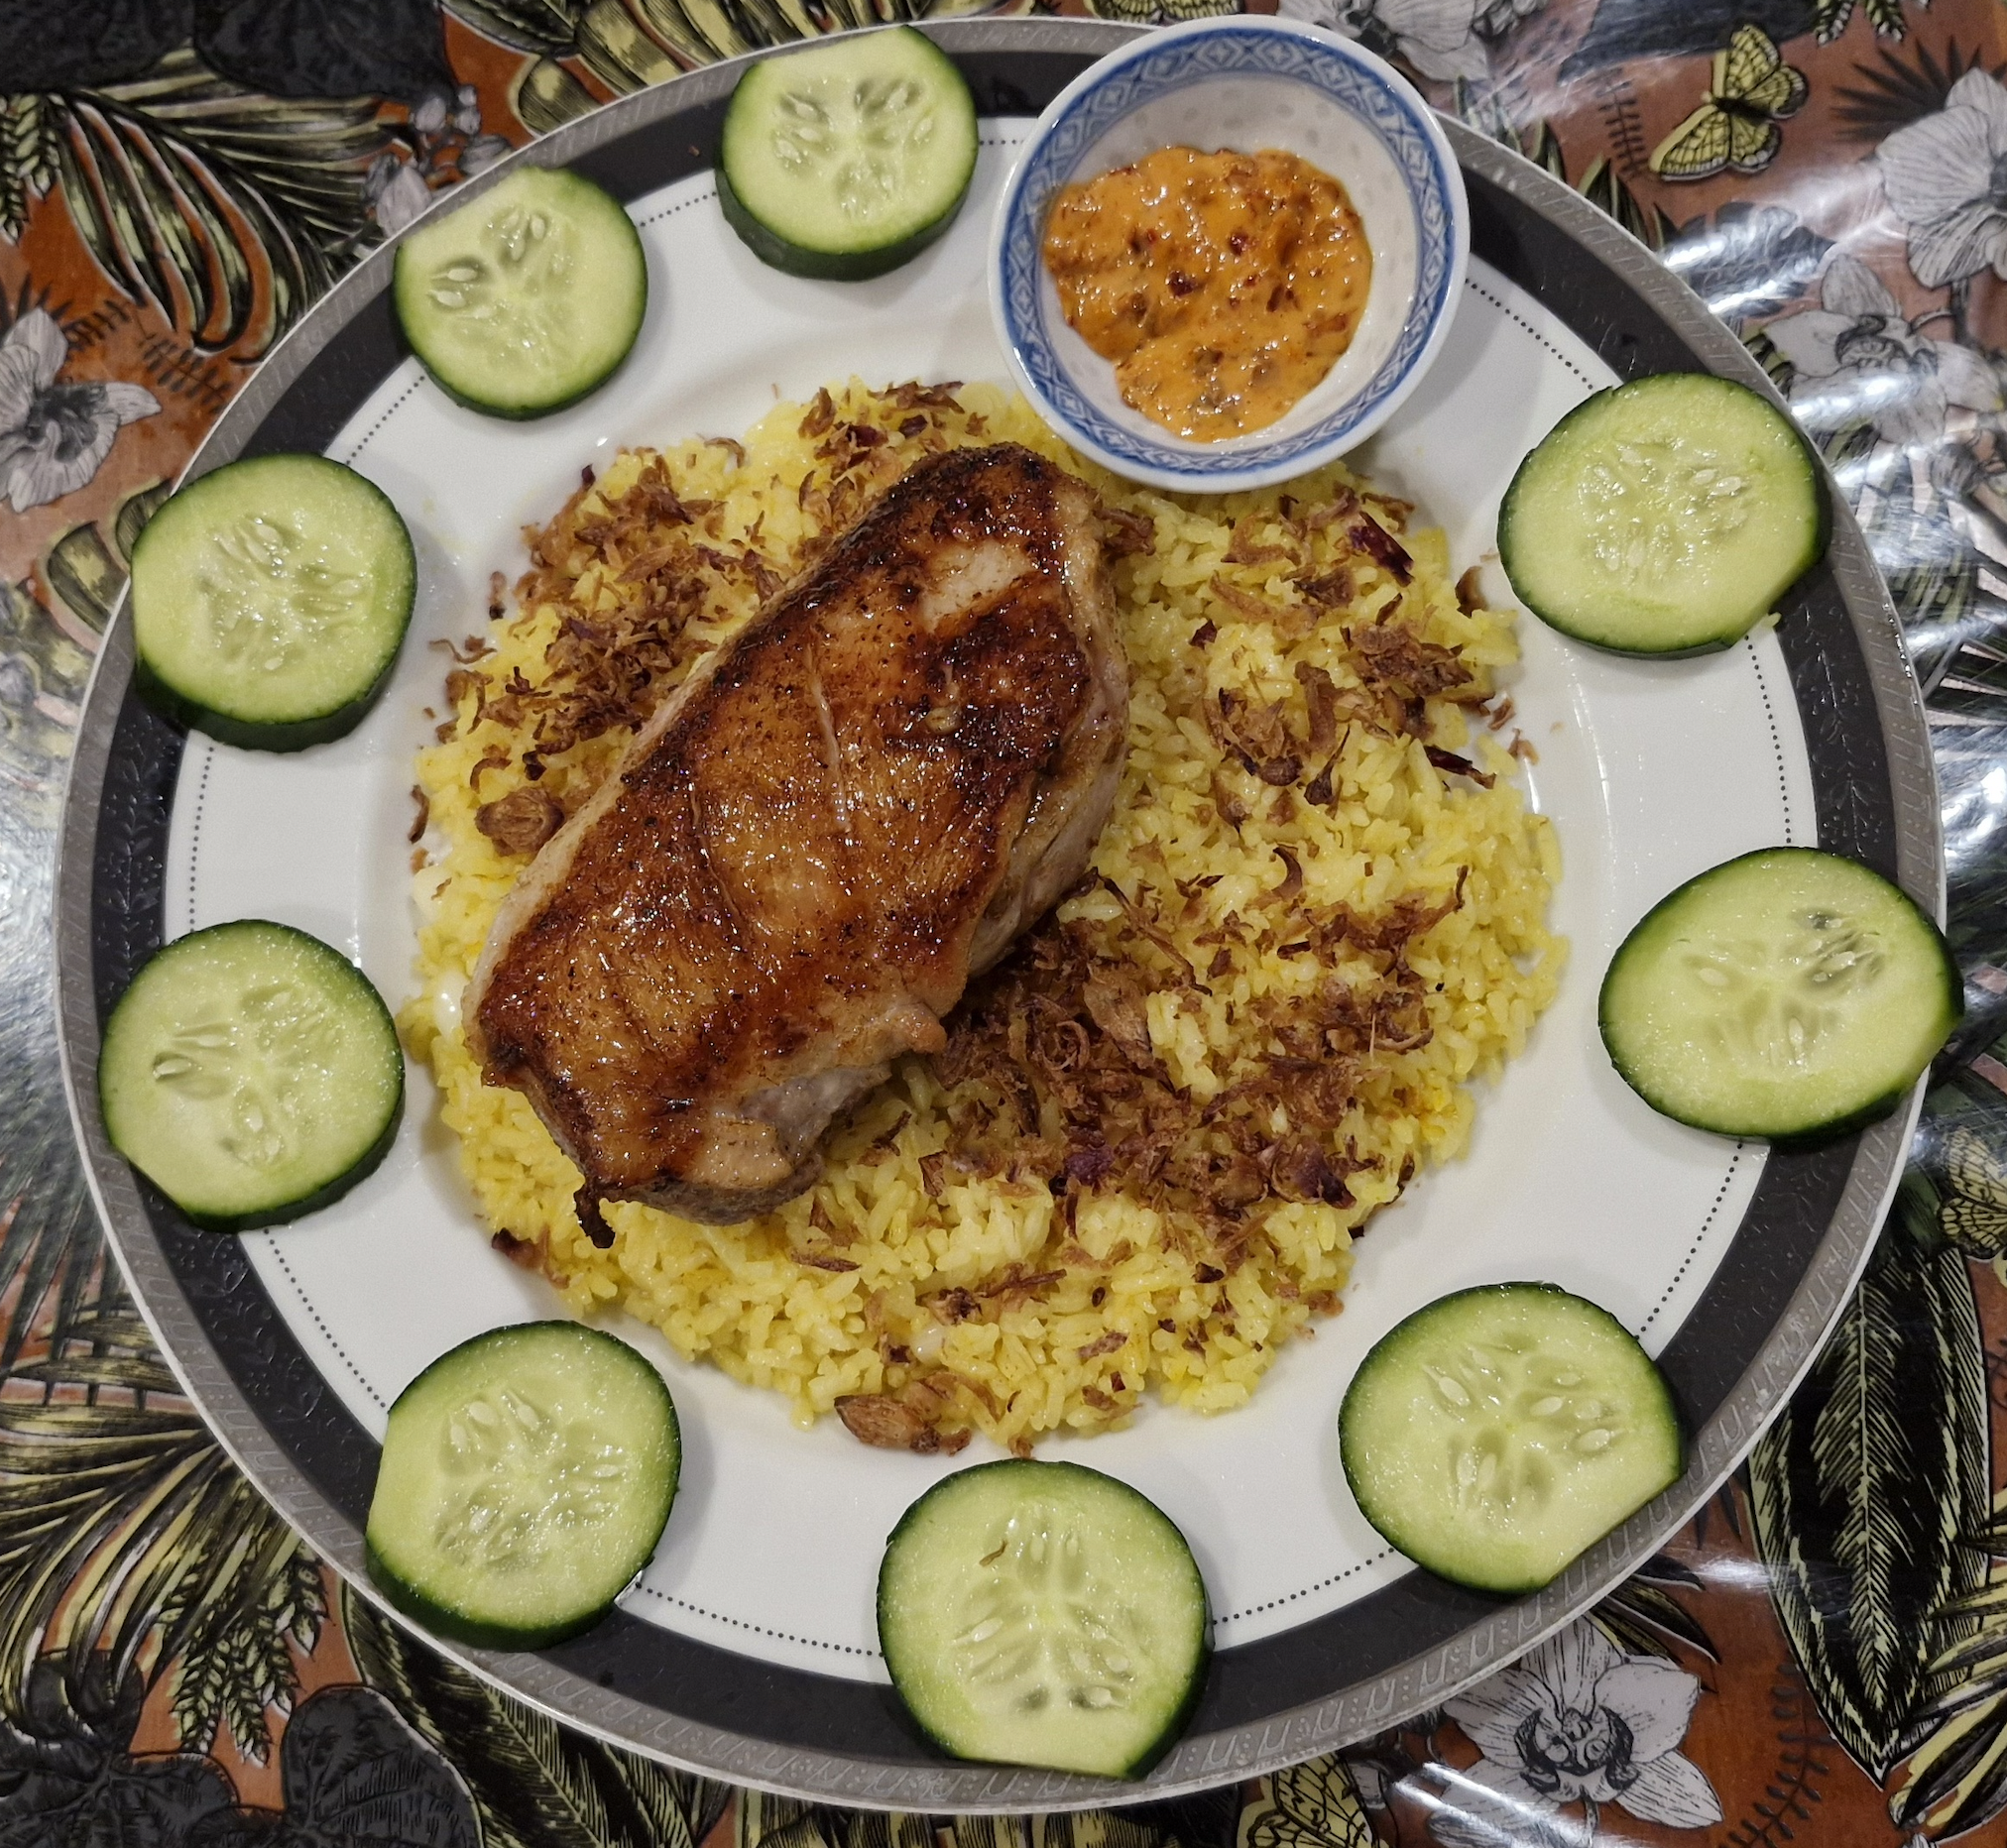
The red sauce in the little pot is my sambal-plus-coconut-milk creation.
Prawn Canapés (for Christmas, in this case)
Several years ago, a friend of mine made amazing prawn canapés. They each had three capers on top. I remember them so fondly that I bought capers last Christmas (and hated them).
This year, I hunted down the recipe she’d started with, and found some other cool recipes along the way. One of them recommended mixing fresh chives into the cream cheese, but I found it really good without them.
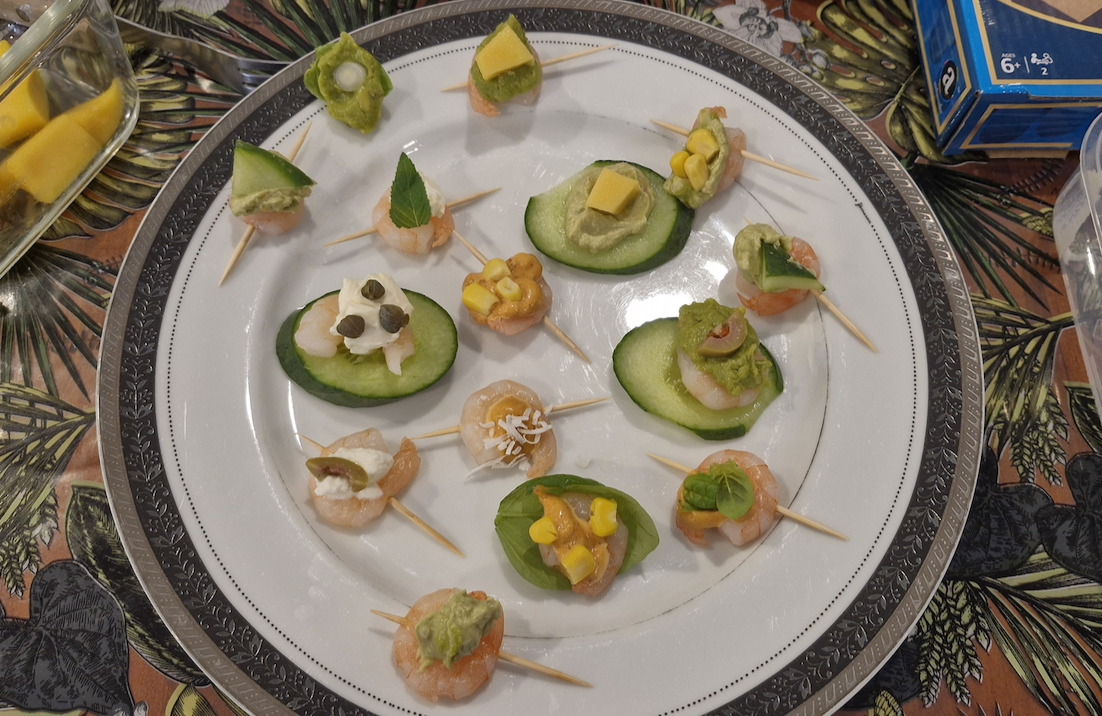
So far, I have done two HIGHLY successful experiment sessions trying out various flavour combinations. It takes a lot to fill up on bite-size hors d’oeuvres, but it can be done. I’ve shared them with three other people too, including my son (it’s always a good day when he embraces a new food, and he has thoroughly enjoyed advising me on taste combinations along the way).
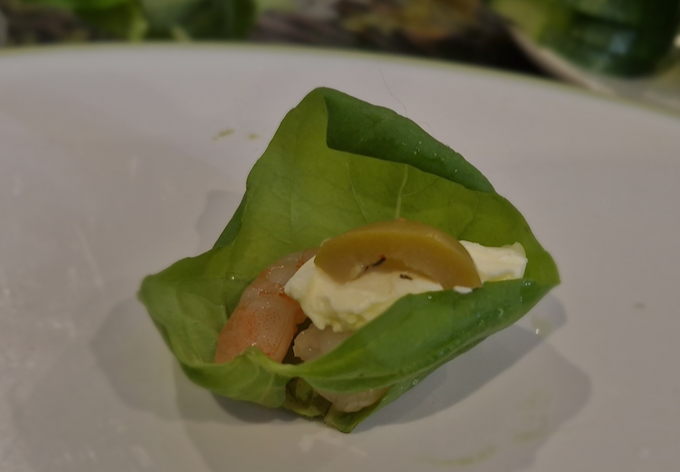
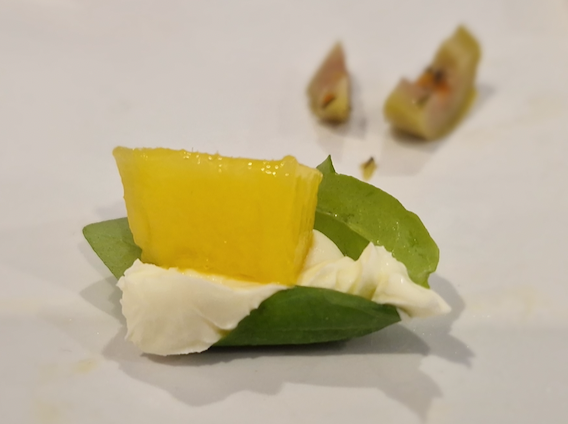
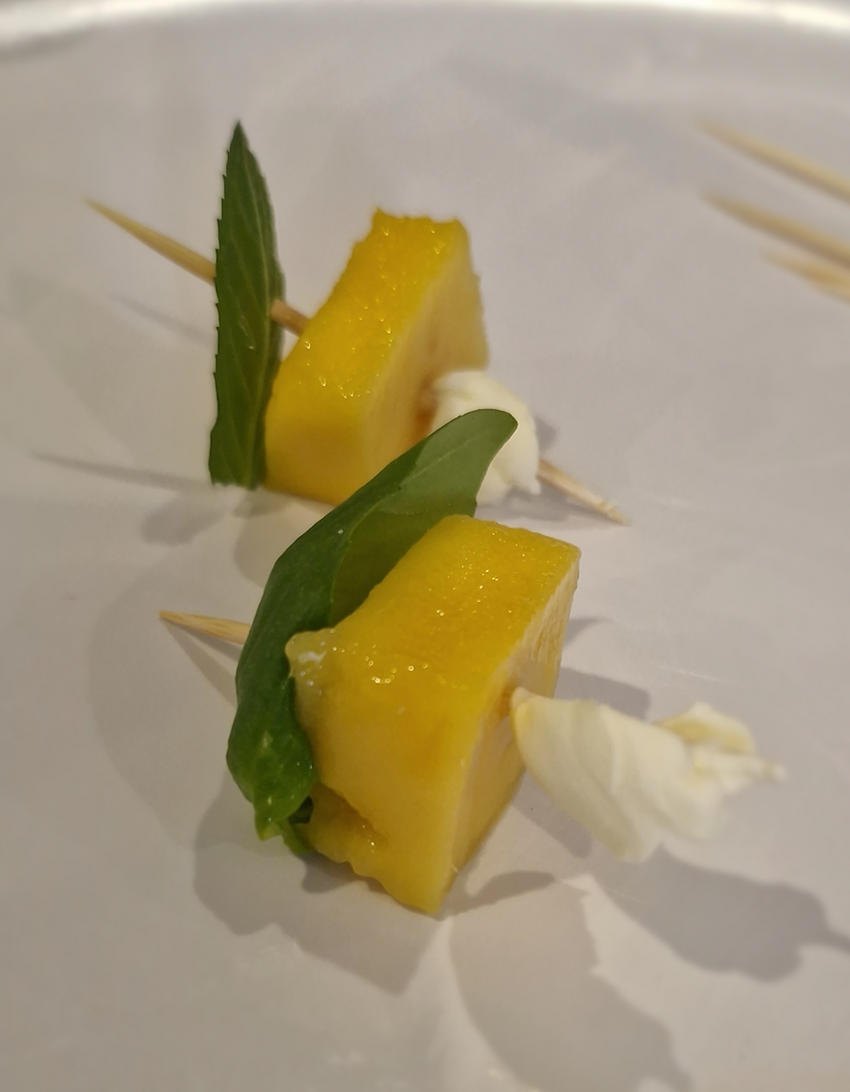
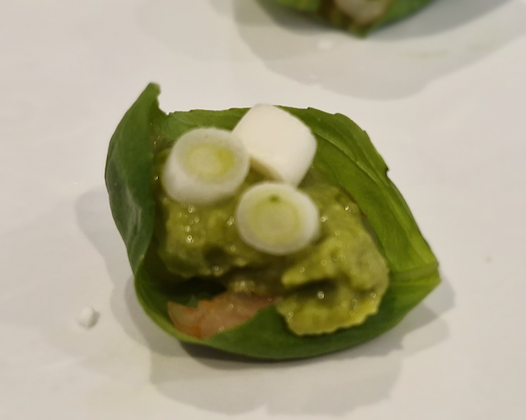
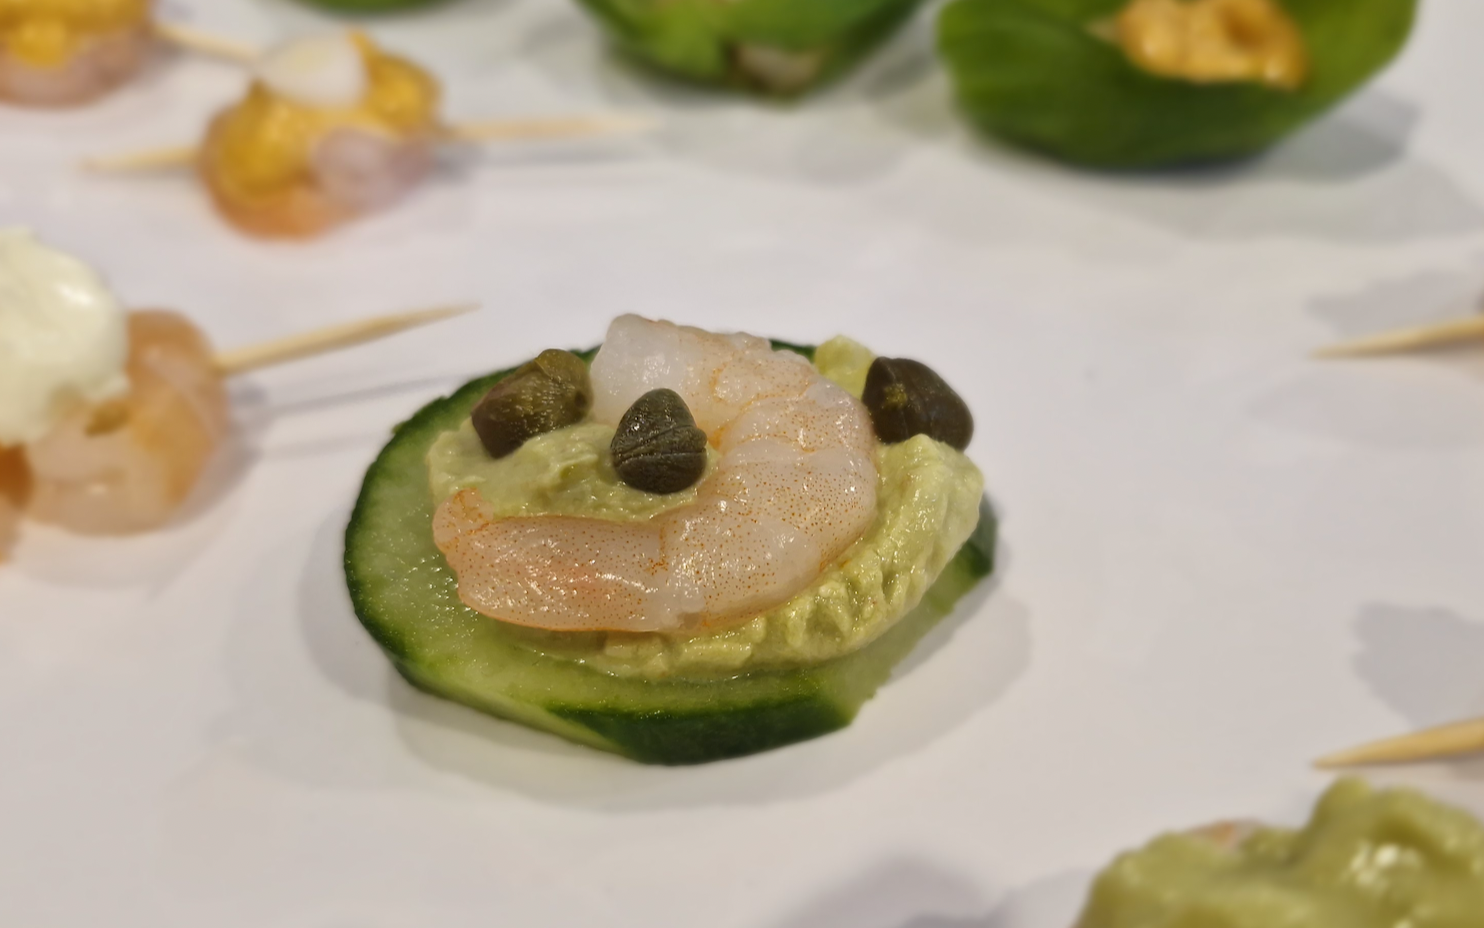
Each canape has a structural item—either a skewer, a slice of cucumber, or a basil leaf—that holds the whole thing together. For the cucumber, slices should be 2mm or less so it holds its shape but doesn’t overwhelm the other flavours. You should cut the cucumber on a diagonal to make the pieces bigger (and be aware that cucumber ‘sweats’ so you may need to pat your slices dry after ten minutes, especially if you put the spicy sauce on them as it doesn’t mix well with water).
I like skewers best. They’re not as floppy as leaves, and they don’t get overwhelmed by cucumber (sorry cucumber; people who love crunch will prefer you). Plus anyone who eats them keeps their fingers completely clean.
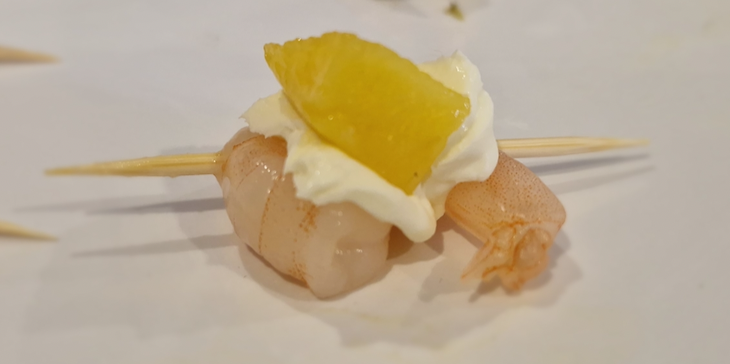
Other than structural items, I mostly stuck to a rule of three: Each canapé has a prawn (except when it doesn’t because not everyone likes prawns), a ‘sauce’, and a garnish.
So here are my ‘sauce’ items:
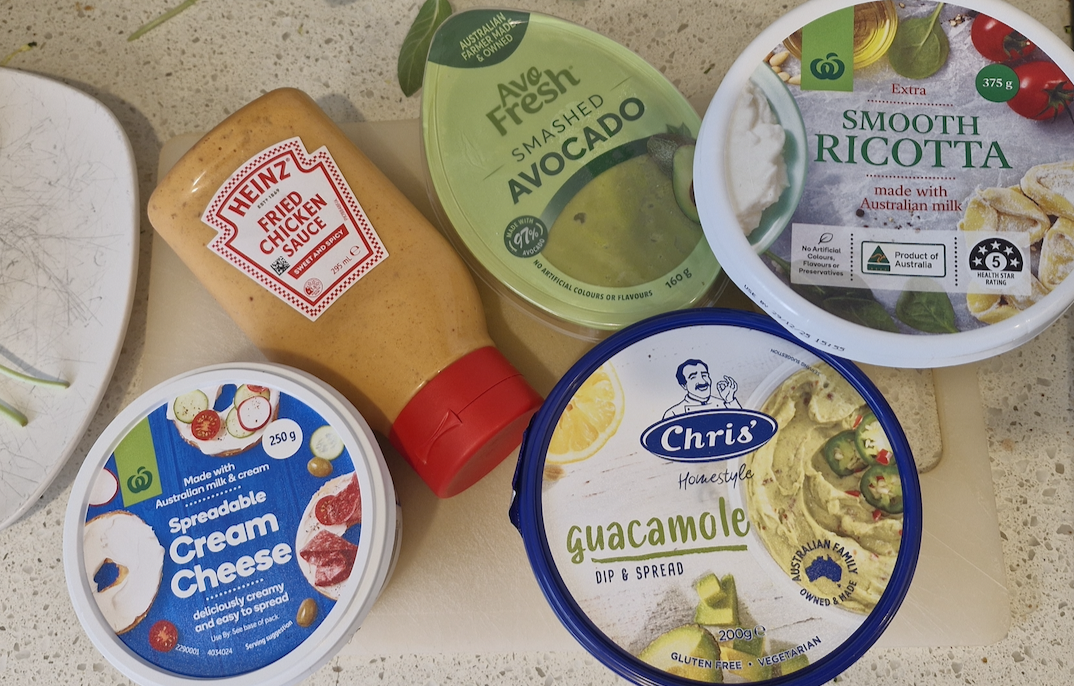
There is already a fundamental problem in that cream cheese and ricotta are too similar (both visually and as a taste), and so are smashed avocado and guacamole. So really one should pick a favourite of each of those pairs.
Avocado VS Guacamole:
Avocado is a refreshingly simple taste—that perfect exactly-ripe avocado flavour. With avocado, you can blend just three key flavours (prawn, avocado, and ?) and the eater can taste them all.
Guacamole has a teeny tiny bit of spice, which will sharply divide tasters. It is delightfully complex in flavour, hitting several notes in a delightful chord.
Conclusion: For younger kids or those who dislike spice, pure avocado is the winner. But for those who want something gourmet and fascinating, I’d pick guacamole for sure. You can make your own if you like, although you want to be sure it won’t brown.
Cream Cheese VS Ricotta:
Both can be savoury or sweet, but cream cheese is oh so creamy so it lends itself to a more dessert-like concoction. Cream cheese is often the base of dips because it’s so yummy. It’s indulgent and rich while still being a subtle flavour that can blend with almost anything.
Ricotta is yummy too, and also blends beautifully with almost anything, but it’s a lot lighter and (presumably) healthier.
Conclusion: For people that cheerfully throw diets out the window and want to seriously get into the most amazing/special treats on offer, cream cheese is the winner. For those that can’t handle too much rich food and/or want canapés that are genuinely healthy, use ricotta.
The “Fried Chicken Sauce” in the photo does not contain chicken. I found it in Woollies in a cardboard stand with other sauces in the fresh food area. It tastes like sweet chilli sauce mixed with mayo. At first it tastes completely sweet, and then the spice hits. It’s a real journey every time. It does burn the mouth a little, but I still enjoyed it (I’m fairly wimpy but getting much less so lately).
Garnishes!
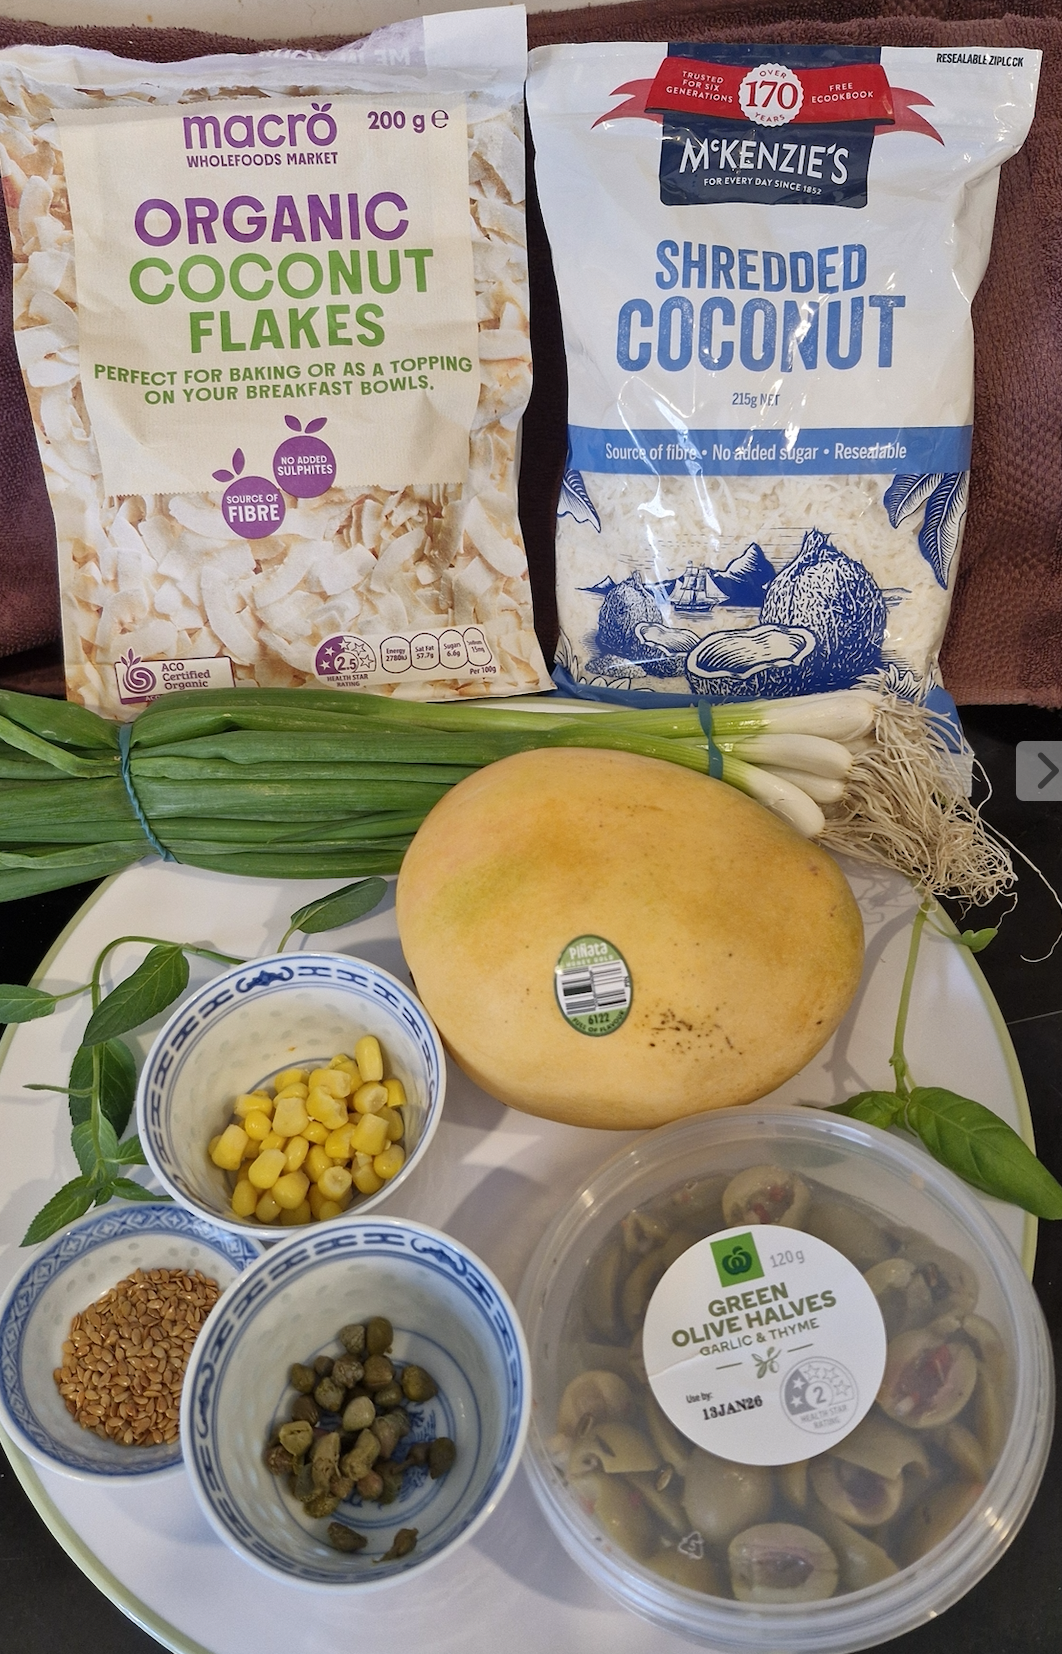
There are two types of coconut because I wanted to experiment and see which was best (I also tried desiccated coconut but forgot to put it in this photo). The leaves are basil, and chocolate mint. There are spring onions, sweet corn, capers (lol), toasted sesame seeds, and green olives. And mango.
I chose not to use any variety of mini tomato because they’re a pain to cut up. But who knows? I may get inspired to get into them later. The red colour certainly pops, which is cool.
The olives are INTENSE in flavour and needed to be cut into eighths. The mango was also surprisingly potent as a flavour, so I cut it into quite small pieces too. The sesame seeds were terrible (and I tried non-toasted sesame seeds too). Their flavour completely vanished, and then they crunched weirdly (like bits of eggshell had accidentally fallen in the sauce) and/or tried to stick in my teeth. I think all nuts would have a similar effect, unless they were part of a sauce (eg satay sauce could be great).
The only capers I could find were in vinegar, so that is the flavour they brought to the table. Olives, obviously, are crazy salty. My own flavour inclinations lean strongly towards umami and sweetness, so it’s good to have sour and salty in the mix for other taste styles. I quite like a bit of salt sometimes, but pretty much never like anything sour. However, the capers (which I carefully dried before using) tasted interesting enough that I was reasonably happy to eat them. I think I need to find fresh capers somewhere. Probably not this year though.
The corn is pretty but just kind of boring, and feels ordinary/cheap. I think it’s worthwhile with the avocado or guacamole (a nice shout-out to South American cuisine), but not with anything else. My son and my niece are obsessed with corn, so I’ll keep it in the mix for that reason.
The chocolate mint is fairly similar to basil but doesn’t work as well taste-wise except with mango and/or cream cheese, when it shines. you can also make these without prawns for anyone who doesn’t eat prawns, although they lack structural integrity. They’re basically a dessert and are definitely a crowd-pleaser. They might work better with a leaf base but served on a spoon.
Coconut looks amazing and goes with prawns really well… but I’m still not 100% sure it worked well with these canapes. The shredded coconut had by far the best texture and the best look, but I still found the mouthfeel a little weird. But maybe weird is good—for variety, if nothing else. I liked the idea of it as a modifier for the spicy sauce, and I forgot to try it with the avo/guacamole (it’s no good with the cream cheese/ricotta, either visually or as a taste).
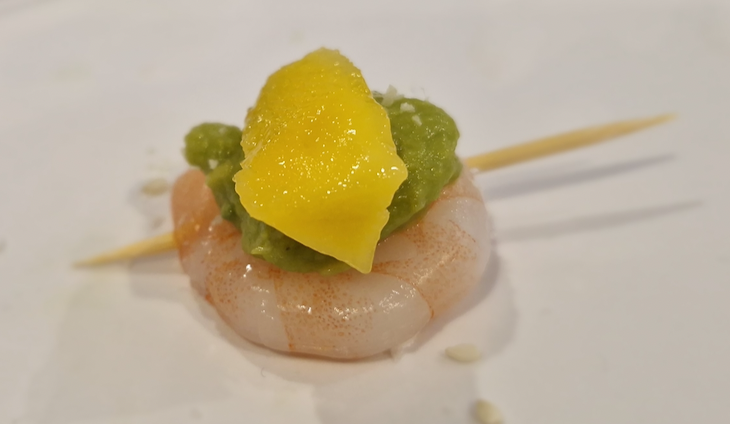
In this pic, the spicy sauce is paired with a single piece of spring onion, then with desiccated coconut, then coconut flakes, and finally shredded coconut. If you look at the top left piece or the bottom right, you can also see the spicy sauce seems to be melting. That is due to the fact that the prawns weren’t completely dry. So next time I’ll use more paper towels and make sure the prawns are fully dry.
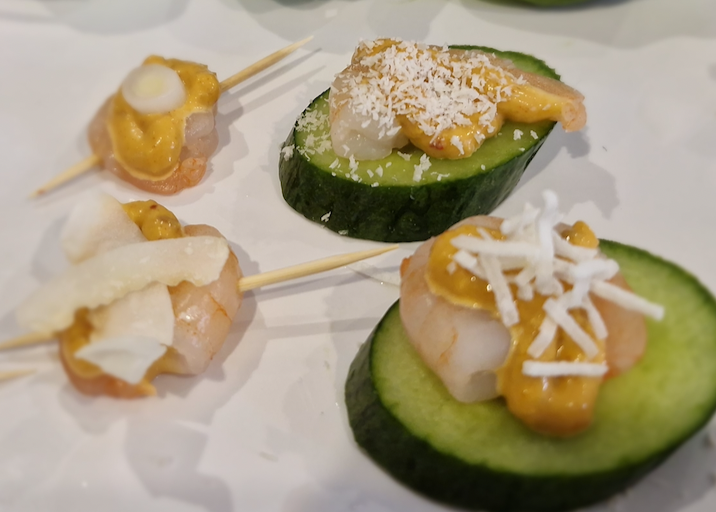
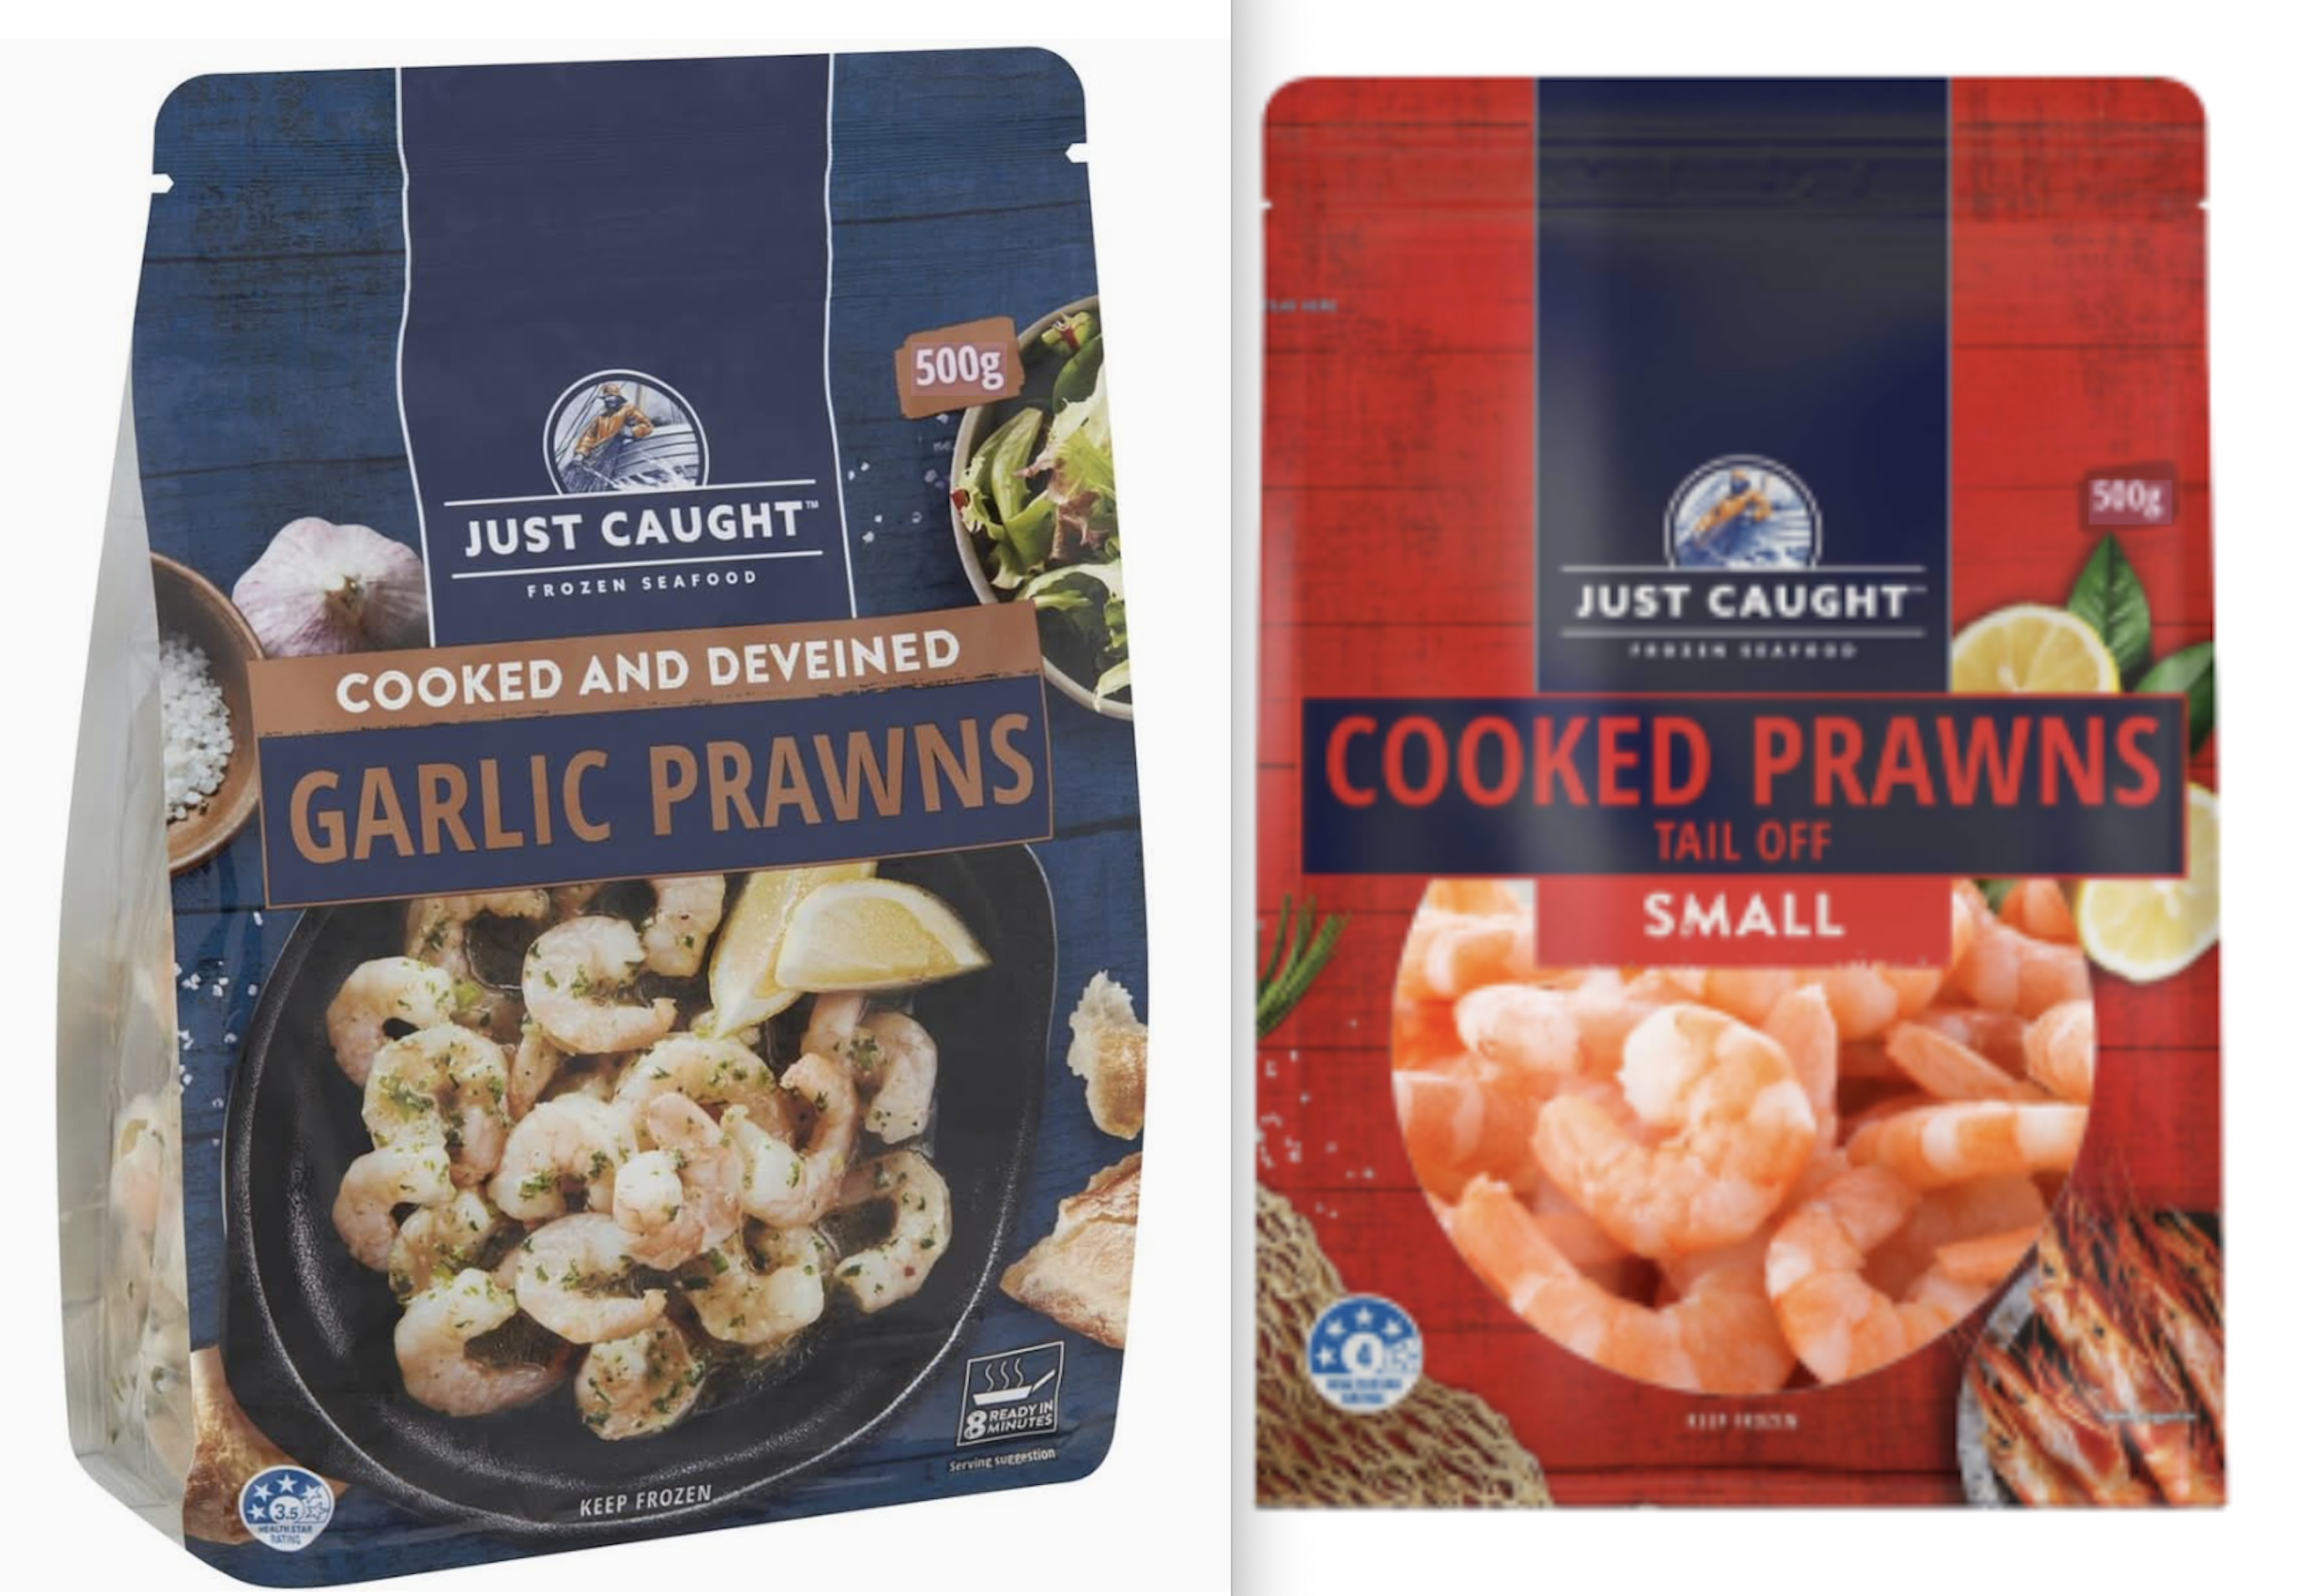
Prawns! My favourite are the pre-cooked tail-off deveined Garlic Prawns, but any cooked and deveined and de-tailed prawns are good. Or you can use whatever style of prawns you personally like.
These are both sold frozen so you need to defrost them before you start. With the garlic prawns I chuck them in a fry pan for about ten minutes (then drain off a horrifying amount of butter and pat them dry). With the others I run them under cold water for about five minutes (really more like thirty seconds then I wander off for five minutes, then repeat until they’re good—and again, pat them dry with paper towels and store them in the fridge until I’m ready.
(ProTip: Make sure no cats are able to access your kitchen at this time.)
It would be a LOT less work to use bigger prawns. But I am very socially anxious, and eating any appetiser that takes more than a bite is very awkward for me. Plus I like the way that the symphony of flavours all play at exactly the same time in that one amazing mouthful. It’s an ah! moment.
These two photos show really nice mini prawn salads that healthy adults will love. And they’re delicious! That’s basil, prawn, guacamole, and spring onion on the left, and cucumber, prawn, avocado and capers on the right. Apologies for the terrible photos.
PREPARATION:
You need to get absolutely everything ready before you start, including a bowl for rubbish. You’ll need containers or plates for the finished canapés; you’ll need to prepare anything that needs draining or cutting or washing or drying; you’ll need to grab a thousand pairs of teaspoons/tongs for dishing things out (enough that if one spoon touches a prawn you can just chuck that one aside and grab a fresh one), etc. You’ll also need toothpicks. And of course cucumbers. Small basil leaves are best for garnishing; the big leaves are good for being your structural base. They curve like a little boat, which is cute.
STEP ONE
Lay out all your prawns (or as many as you can fit on your working surface). It often helps to put them directly on a plate or into your container of choice (something wide and shallow with a lid). Then wash your hands of course, before you get molecules of prawns absolutely everywhere.

You’ll definitely find some prawns that still have their digestive system attached. I always chuck them straight into the rubbish bowl because I’m squeamish; you can just peel them off yourself.
STEP TWO
Add your sauces. The supermarket avocado products don’t easily go brown, so you have loads of time. (Speaking of time, making these canapes takes a LONG time. Possibly hours.)
STEP THREE
Garnishes. And you’re done!
Store in the fridge, obviously.
My favourite garnish for the spicy sauce is a basil leaf (and put it on a cucumber if you want to make it milder). Or mango. Or MAYBE shredded coconut. I can’t decide if coconut is worthwhile or not.*
For cream cheese, I like mango best. Or basil. Or chocolate mint (regular mint would be great too). Or, weirdly, olive.
For ricotta, all the same garnishes as cream cheese work well, but it feels more savoury. Ooh! I bet it’s amazing with fresh chives.* (Sidebar: Dill sprigs look great but I hate dill. You may love it. I bet it goes well with capers or olives for a savoury double-punch.)
For avocado, I like spring onion. Or capers. I think mango was good but I can’t remember.* I bet it’s great with fresh chives too.*
For guacamole, spring onion. Or corn. Maybe olive? I can’t remember.*
*I’ll have to do more experiments.
UPDATE:
Fresh chives are too subtle a taste so they don’t really work (although they look amazing).
The smashed avo starts to brown a very little bit in the fridge from the next day (the guacamole doesn’t).